Media Production Suite
Operation Manual [English]
 Common : Operational Rquirements / Software Installation / Use Flow
 Setting function: Management of Accounts
 DeviceManager function : Built-in EasyIPSetupToolPlus Functionality / Camera device management / Scene file management for some models
 PTZ Control : Pan/Tilt/Zoom , Camera Preset / Camera Adjustment
 Information function : Application software version / Manage Plug-ins (Additional Fee)
 Visual Preset function : Operation / License Management
 Video Mixer function : Operation / License Management
 Auto Tracking function : Operation / License Management
 Advanced Auto Framing function : Operation / License Management
 "PASS Check your licenses and extend the period of time-limited licenses"
-
49. [Auto Tracking] Tracking Disable Area is disabled and cannot be used.
The current version (Ver. 1.4.43) as of September 2024 does not support Tracking Disable Area.
This will be supported in a future version update.
Sep., 2024 updated
-
48. [Auto Tracking] Differences in functions and specifications from the existing "Auto Tracking software (individual app)".
Especially, Main/Sub server configuration not supported. A maximum of 8 units can be used for automatic tracking per PC.
(On the other hand, with the existing "Auto Tracking software (individual app)", Auto Tracking of more than 8 units was possible by using sub-PCs.)
Additionally, as of September 2024, the following are not supported:
PTZ Cameras : AW-HE130/HN130
OS : Windows Server 2016/2019
GPU : GPU Pascal architecture
Auto Tracking Functions : UHD Crop tracking, UE4 overhead tracking
Sep., 2024 updated
-
47. [Troubleshooting : Auto Tracking] Auto Tracking does not start even if a person enters the Auto Start Area you set. → Face Recognition settings
If a face is selected for face recognition or Auto Face Search mode is enabled,
automatic tracking will start only when a person with a registered face enters the Auto Start Area you set.
If you want automatic tracking to start for all people when they enter the Auto Start Area,
do not select an image for face recognition and disable Auto Face Search.
Sep., 2024 updated
-
46. [Troubleshooting : Auto Tracking] Auto Tracking is enabled and set to Start, but auto tracking does not work at a certain position. → Limitation settings
Check the Limitation settings on the PTZ Control screen.
If the Limitation setting is enabled (blue), press the Limitation button to disable it.
Sep., 2024 updated
-
45. [Troubleshooting : Auto Tracking] Even if the Auto Tracking button is enabled, the tracking frame is not displayed. → Confirm the GPU driver version, and others.
If the tracking frame does not appear even after trying the FAQ items 43 and 44 on this page,
please restart the Media Production Suite app.
If the above does not solve the problem, confirm the version of your GPU driver.
Please download and install the latest GPU driver from the NVIDIA website.
Sep., 2024 updated
-
44. [Troubleshooting : Auto Tracking] Even if the Auto Tracking button is enabled, the tracking frame is not displayed. → PTZ camera's built-in Auto Tracking Settings
Please check the settings of the PTZ camera's built-in auto-tracking function.
- If you want to display the tracking frame with built-in auto-tracking
Currently, you cannot turn the built-in auto-tracking tracking frame display on/off in the Media Production Suite app.
Check the Marker settings from the camera's web screen
- If you want to display the tracking frame with the AW-SF100G/200G/202G/203G PC server-type auto-tracking
Press the Detail Setting button on the PTZ Control screen and confirm that the Tracking type item on the displayed pop-up screen is set to PC_GPU.
Sep., 2024 updated
-
43. [Troubleshooting : Auto Tracking] Even if the Auto Tracking button is enabled, the tracking frame is not displayed. → Mask Area Settings
Check the Mask Area settings.
1. Press the Mask Area button on the PTZ Control screen and check if the position where the tracking frame does not appear overlaps with the Mask Area frame on the camera image.
2. If the position where the tracking frame does not appear overlaps with the Mask Area frame, press the "x" button in the upper right of the Mask Area frame on the camera image to delete the target Mask Area frame.
Sep., 2024 updated
-
42. [Troubleshooting : Auto Tracking] Face recognition doesn't work on the selected image. → Confirm the image for face recognition
Face recognition may work better if you select a face image, adjust the subject size, camera parameters, and shooting environment.
- Select a face image
When selecting a face image to be recognized, select an image that faces forward as much as possible.
Face recognition performance may deteriorate if the face is facing diagonally or to the side.
Also, select an image of a face without a mask or hat.
- If the size of the face frame is small compared to the camera image, face recognition may not work well.
The larger the face frame compared to the camera image, the better the recognition performance.
(Face recognition performance according to subject size: Full shot < Full body shot < Upper body shot)
For accurate face recognition, shoot from an angle that makes the subject's face as large as possible.
- Reducing camera noise and adjusting the image to a brighter image may improve recognition performance.
Please check by adjusting the camera parameters below and the lighting environment when shooting.
・Iris
・Gain
・WB
・Shutter
Sep., 2024 updated
-
41. [Auto Tracking] How to adjust subject movement sensitivity and PTZ control speed when auto tracking is enabled?
Adjust the Sensitivity level and PTZ speed for Auto Tracking in Detail Settings.
1. With the Auto Tracking button ON, press the Detail Setting button to display the Detail Setting pop-up screen.
2. Set the Tracking Type item in the Detail Setting pop-up screen to PC_GPU and press the Auto Tracking button.
3. Press the Detail Setting button again to display the Detail Setting pop-up screen.
• Automatic tracking speed when the subject moves
- If it is fast, set Sensitivity level to the "-" direction ( When the subject stops, the camera composition becomes stable.)
- If it's slow, set Sensitivity level in the "+" direction (Even with a close-up angle of the subject, it will be less likely to get lost)
• Auto-tracking speed when the subject is constantly moving
- If it is too fast, set the PTZ speed for Auto Tracking in the "-" direction (This will create a stable camera composition that matches the movement of the subject).
- If it is slow, set the PTZ speed for Auto Tracking in the "+" direction (This will make it harder to lose the subject even if the subject is moving fast).
Sep., 2024 updated
-
40. [Auto Tracking] How to use the built-in auto tracking function of a PTZ camera on the Media Production Suite app with the Auto Tracking Plug-in installed?
Set the Tracking type in Detail Settings to "Built-In".
1. With the Auto Tracking button OFF, press the Detail Setting button to display the Detail Setting pop-up screen.
2. Set the Tracking Type item in the Detail Setting pop-up screen to Built-In and press the Auto Tracking button.
(*) Only the PTZ Cameras AW-UE30/40/50/80, which supports built-in auto tracking, have "Built-In" in the Tracking Type item (as of September 2024).
Sep., 2024 updated
-
39. [Auto Tracking] How many units can be used for automatic tracking per PC ?
A maximum of 8 units can be used for automatic tracking per PC.
With the existing "Auto Tracking software (individual app)", Auto Tracking of more than 8 units was possible by using sub-PCs.
But the "Auto Tracking Plug-in for the Media Production Suite" does not support a Main/Sub server configuration (as of September 2024).
Sep., 2024 updated
-
38. [Video Mixer] Regarding Audio
The current version does not support audio. It will be supported in a future update.
Jun., 2024 updated
-
37. [Video Mixer] If it is necessary to re-capture the AI Keying Background image
If the following shooting conditions change, re-capture the AI Keying Background image.
If you do not recapture, the extraction operation may not be performed correctly, such as extracting objects other than the subject.
When recapturing is required
- The camera's shooting position (angle of view) has changed
- Part of the background has changed
- The lighting/sunlight conditions have changed (changes in shadows or color tones)
Jun., 2024 updated
-
36. [Video Mixer] Restrictions when using AI Keying
■ Restrictions when switching PGM Out between Scenes that include AI Keying
• In the following cases, video distortion has happened. (*1)
- Input for AI Keying, such as a camera, is the same between Scenes switching, but the AI Keying Background (shooting position) is different.
• In the following cases, the transition effect is force to be CUT even if you set other ones. (*2)
- Input for AI Keying, such as a camera, is different between Scenes switching.
- Input for AI Keying, such as a camera, is the same between Scenes switching, but the AI Keying Background (shooting position) is different.
*1: We plan to improve the image quality when switching in a future update.
*2: This is due to the limitation that different AI Keying cannot be used simultaneously.
■Restrictions when previewing a Scene that includes AI Keying
• When a Scene which includes AI keying is selected as PGM Out and different one which includes other AI Keying is selected as PVW, the PVW is composited by the Scene used in PGM Out.(*)
* : This is due to the limitation that different AI Keying cannot be used simultaneously.
Jun., 2024 updated
-
35. [Video Mixer] Data saved when capturing AI Keying Background
The followings are saved to Media Production Suite app when capturing AI Keying Background with a PTZ camera.
・Camera Pan/Tilt position
・Camera Zoom position
*Image adjustment values such as Focus and Iris will not be saved.
If you are switching between multiple AI Keying Backgrounds on the same PTZ camera, we highly recommend setting image quality adjustment to Auto.
Jun., 2024 updated
-
34. [Video Mixer] Scene layer size (number of vertical and horizontal pixels)
Please note that the method for calculating size differs when the layer is Input/AI Keying and when it is Movie/Image.
Input/AI Keying
The Input/AI Keying Size value is the ratio to the Scene screen resolution. The resolution of the input video is unrelated.
Movie/Image
The Movie/Image Size value is the ratio to the resolution of the original material.
For example: Differences in operation when the system format is 720/59.94p

Jun., 2024 updated
-
33. [Video Mixer] Scene Restrictions
Each scene can have up to 2 Movies.
Each scene can have only 1 AI Keying.
Jun., 2024 updated
-
32. [Video Mixer] Movie/Image Supported Formats
Movie
MOV, MP4 *Resolution: 3840x2160 or less
Image
PNG, JPEG, BMP *Resolution: 3840x2160 or less, Bit depth: 24bit or 32bit
Jun., 2024 updated
-
31. [Troubleshooting : Video Mixer] What to do if the NDI Output Source Name does not appear on the receiving device such as Studio Monitor → Each settings and Video Mixer Enable
This may appear if you rescan the source several times on the receiving side, such as a Studio Monitor.
In particular, In case of doing that as soon as you startup Media Production Suite app or turn on Video Mixer Enable, it takes some time for the NDI Output to be processed, so it may not be displayed on the receiving side immediately.
This may occur if you turn Video Mixer Enable OFF and then ON again.
Jun., 2024 updated
-
30. [Troubleshooting : Video Mixer] What to do when an Input/Output error occurs → Each settings and Video Mixer Enable
If an SDI error occurs
- Please check that the port number setting for the SDI board is correct.
* Sometimes, even if you have made the settings, the port number settings may be initialized.
If an NDI error occurs
- You may be able to receive properly by turning Reception OFF, waiting a few seconds, and then turning it ON again.
* For NDI|HX Ver.1 cameras such as the AW-UN70/AW-HN70(HN40), try turning it OFF then ON several times.
- Try to execute scan again.
- In case of using NDI|HX Ver.1 stream, make sure that NDI Tools is already installed on your PC.
If an SRT error occurs
- You may be able to receive properly by turning Reception OFF, waiting a few seconds, and then turning it ON again.
If you use SRT Caller sources, try to restart source streaming.
If these procedure can’t work, try to turn off Video Mixer Enable and then turn on it again.
Jun., 2024 updated
-
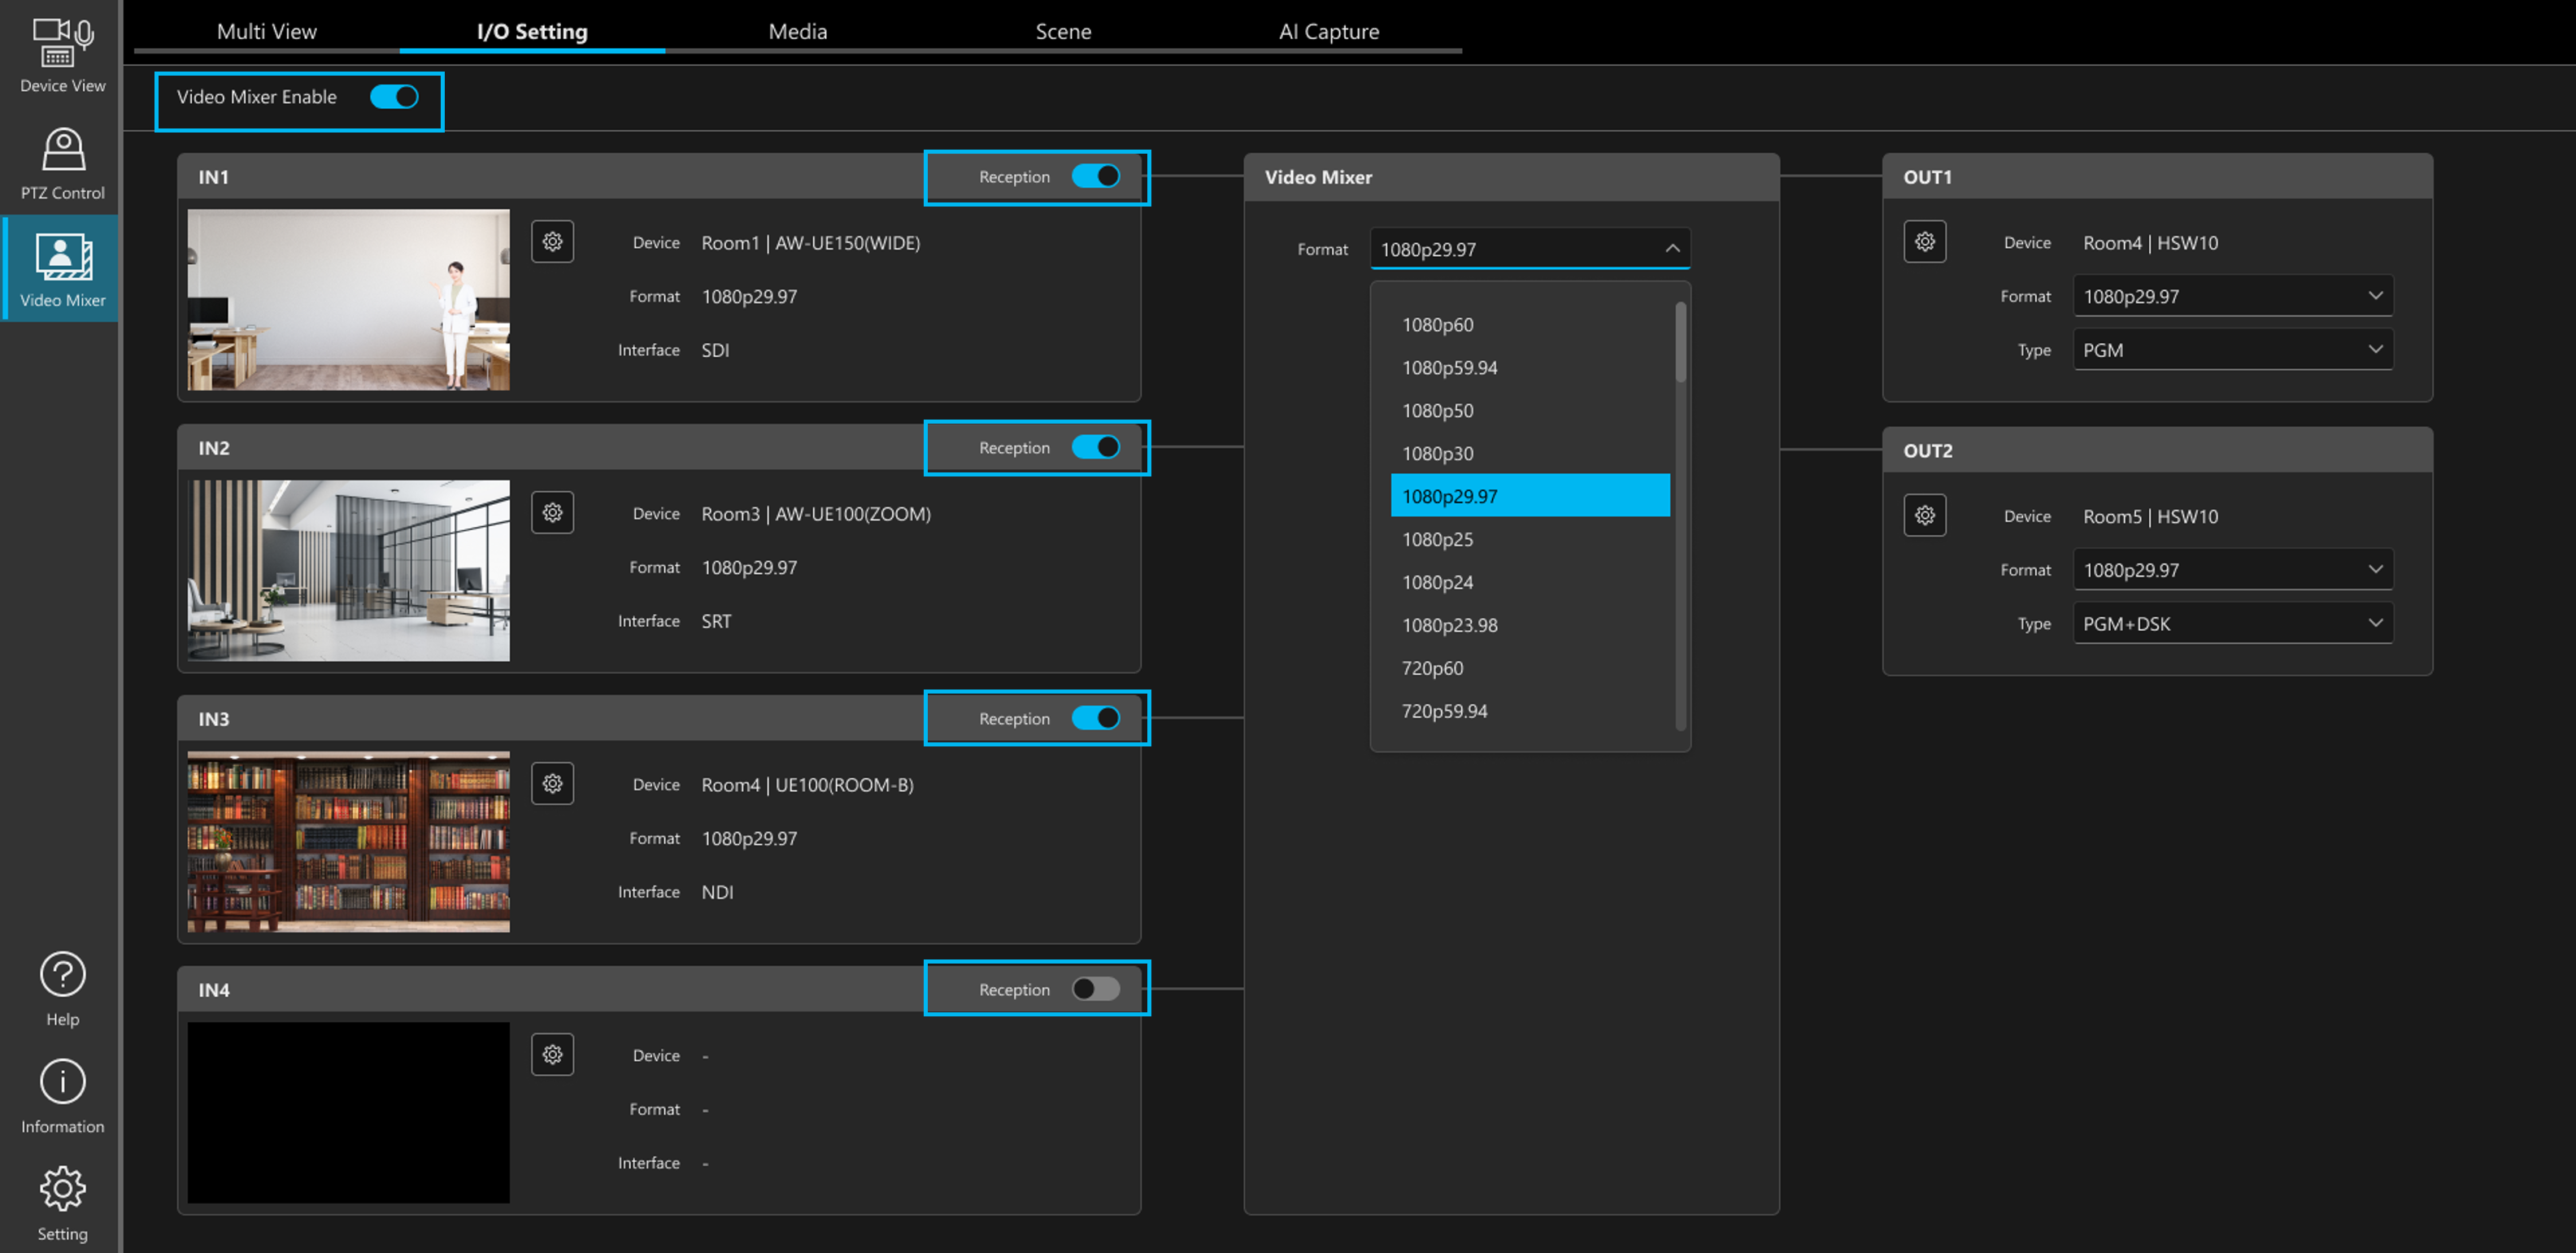
29. [Troubleshooting : Video Mixer] Notes on receiving input video → Turn on Reception for each input
To receive video from an input, you need to turn on not only Video Mixer Enable, but also Reception for each input.
Jun., 2024 updated
-
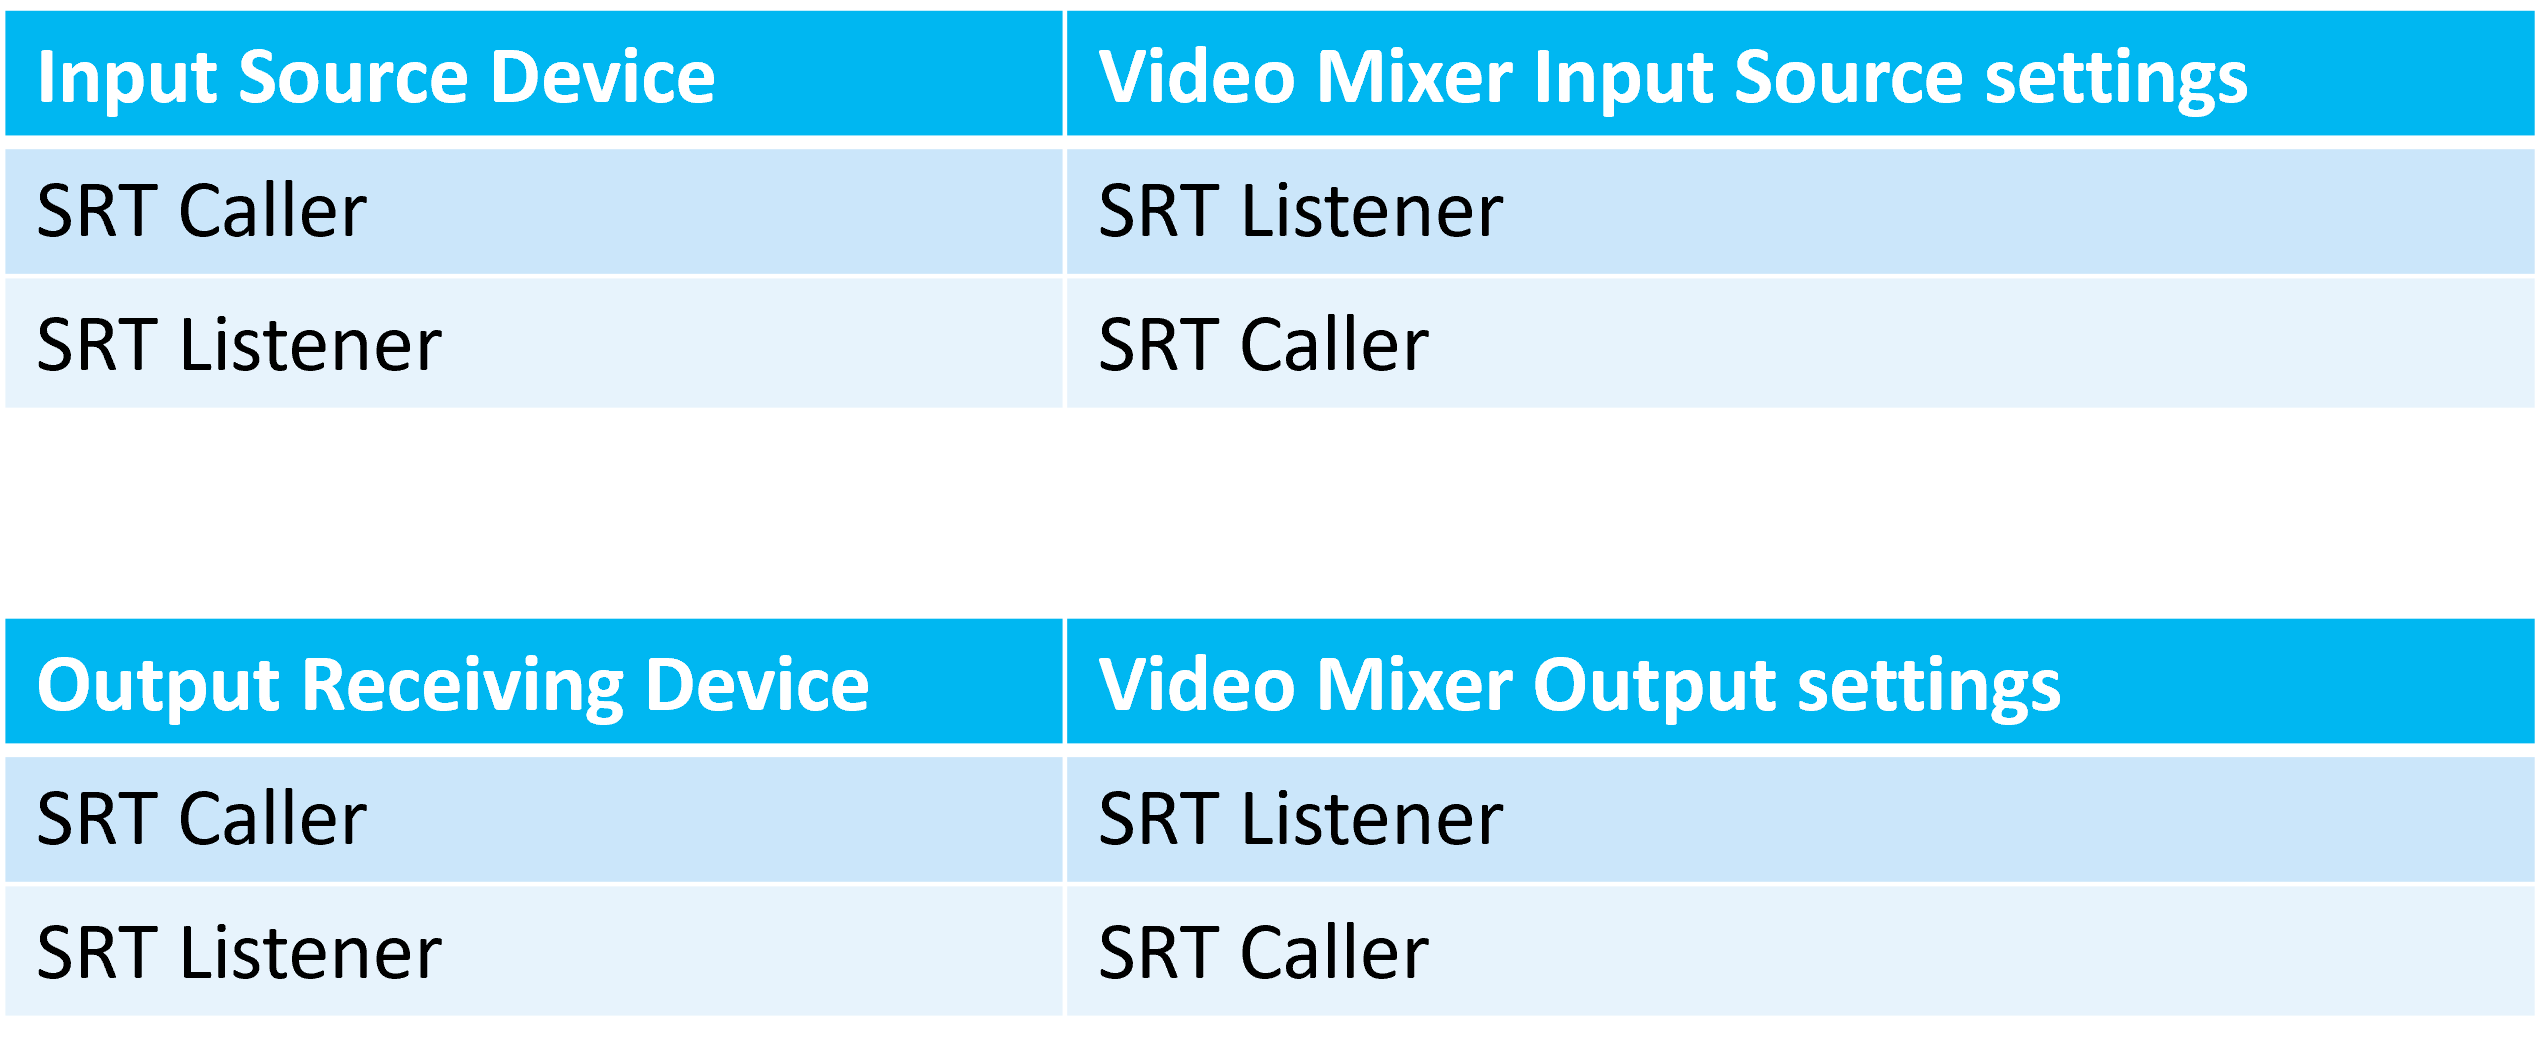
28. [Troubleshooting : Video Mixer] Precautions when using SRT for Input/Output → Caller / Listener Settings
Precautions when using SRT for Input/Output
Jun., 2024 updated
-
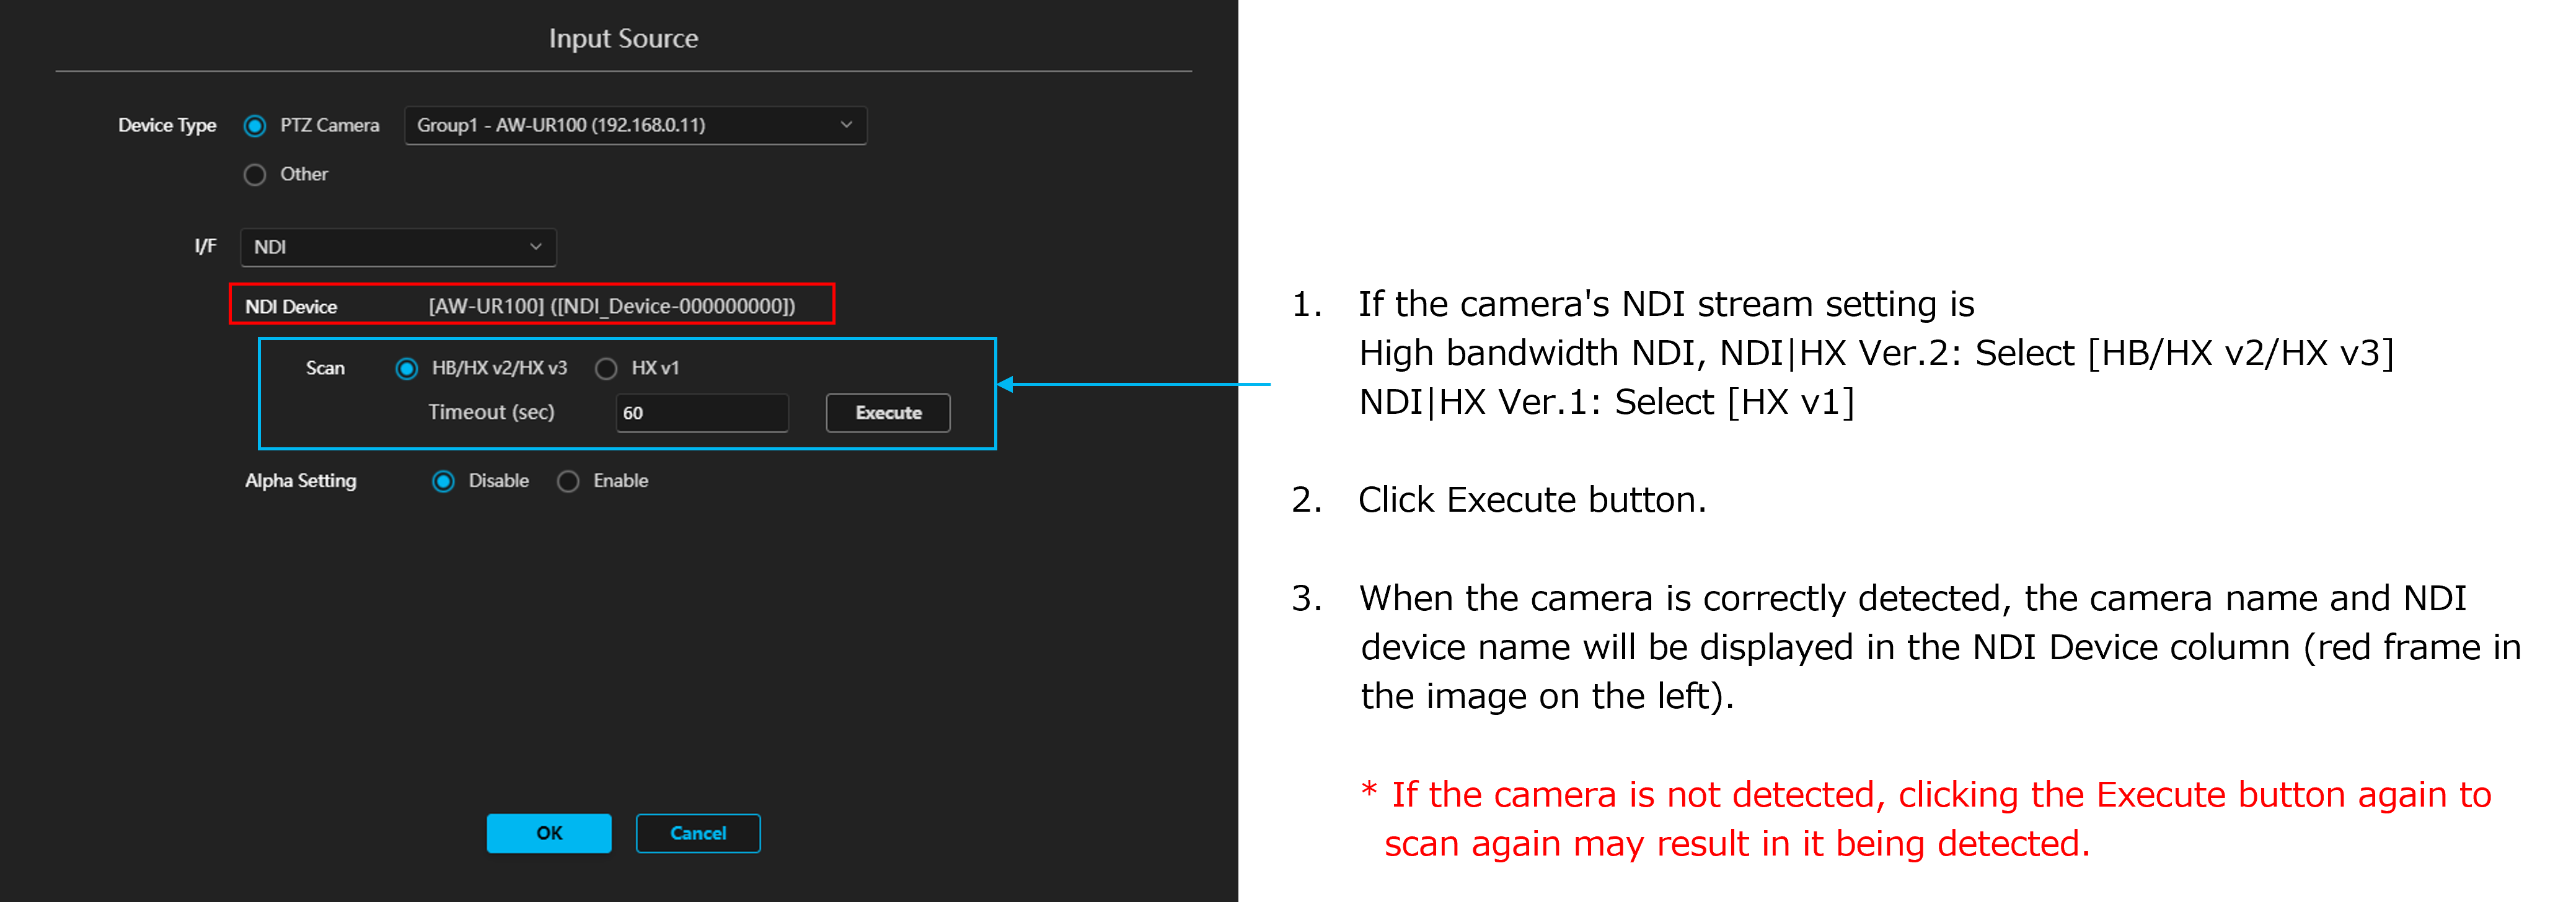
27. [Troubleshooting : Video Mixer] Precautions when using NDI of a remote camera as Input → Scan for devices
You need to scan for devices in the Scan field on the Input settings screen and detect the devices.
* It will not work just by selecting the camera in the PTZ Camera field of Device Type.
Jun., 2024 updated
-
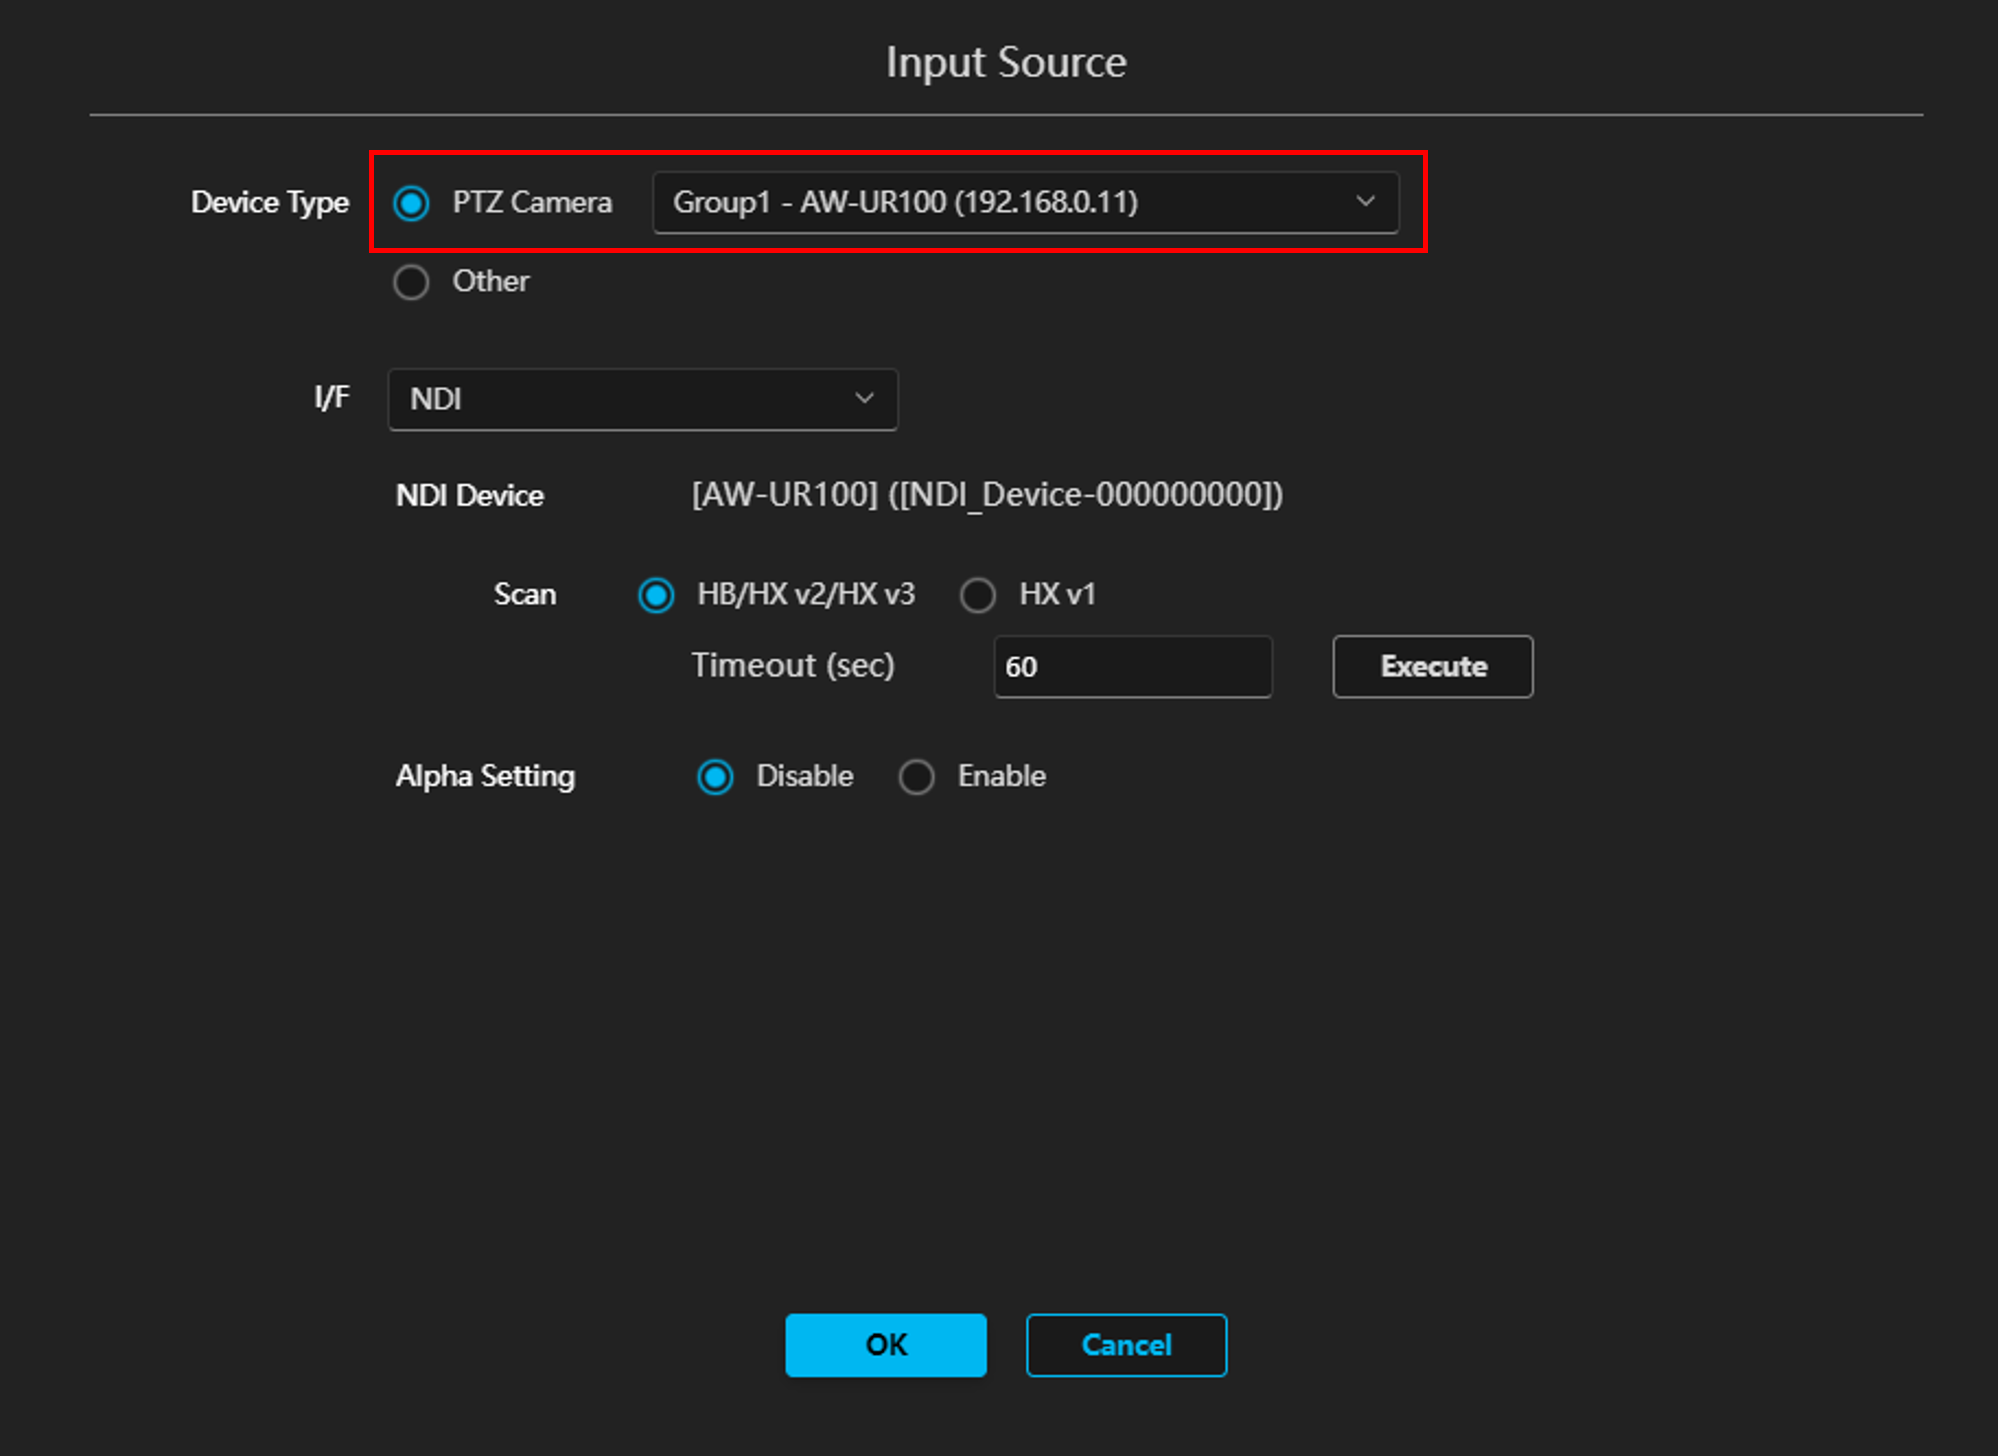
26. [Troubleshooting : Video Mixer] Precautions when using a remote camera for Input → Select [PTZ Camera] in Device Type menu
When using a remote camera for Input, select [PTZ Camera] from [Device Type] menu on the settings screen.
*If you select [Other], you will not be able to control the camera on the AI Capture screen.
Jun., 2024 updated
-
25. [Troubleshooting : Video Mixer] Notes when using NDI|HX Ver.1 for Input → NDI Tools
If you use NDI|HX Ver.1 for Input, you need to install NDI Tools on the PC where Media Production Suite is installed.
* The above conditions apply when using cameras such as AW-UN70/AW-HN70(HN40) (types that select NDI|HX in Priority Mode).
Jun., 2024 updated
-
24. [Troubleshooting : Video Mixer] PC sleep settings → Set your PC not to go into sleep.
Set your PC not to go into sleep mode automatically.
*If your PC goes into sleep mode while Video Mixer is running, Video Mixer may not work properly after the system return to normal mode.
*If Video Mixer does not work properly after returning from sleep, please restart your PC.
Jun., 2024 updated
-
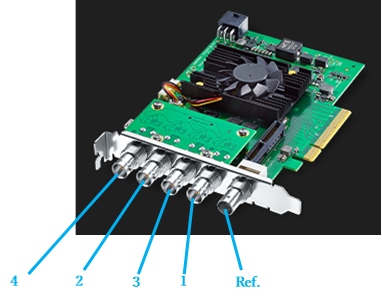
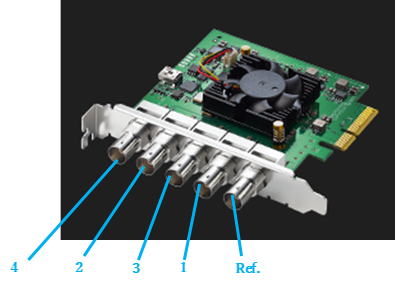
23. [Troubleshooting : Video Mixer] Blackmagic SDI board port number arrangement → SDI port numbers
* Please note that the port numbers are not in numerical order.
DeckLink 8K Pro
DeckLink Duo 2
Jun., 2024 updated
-
22. [Troubleshooting : Video Mixer] Precautions when using Blackmagic SDI boards. → SDI port settings
If you are using a Blackmagic SDI board, the following is required.
- Download and install the Desktop Video software from the Blackmagic website.
- Start the Blackmagic Desktop Video Setup software and change the SDI port settings (Connector Mapping) as follows:
- *Media Production Suite Input/Output does not work properly with the default settings
 DeckLink 8K Pro
 DeckLink 8K Pro (1) : [SDI 1 In or Out]
  DeckLink 8K Pro (2) : [SDI 3 In or Out]
 DeckLink 8K Pro (3) : [SDI 2 In or Out]
 DeckLink 8K Pro (4) : [SDI 4 In or Out]
 DeckLink Duo 2
 DeckLink Duo (1) : [SDI 1]
  DeckLink Duo (2) : [SDI 3]
 DeckLink Duo (3) : [SDI 2]
 DeckLink Duo (4) : [SDI 4]
Jun., 2024 updated
-
21. [Troubleshooting : Plug-ins] Video Mixer / Auto Tracking may not work properly. → GPU Driver version
Please download and install the latest GPU driver from the official NVIDIA website.
* If the driver version is outdated, Video Mixer / Auto Tracking may not work properly.
Sep., 2024 updated
-
20. [Troubleshooting : Plug-ins] I started a trial/activated a paid plug-in (such as Video Mixer / Auto Tracking), but the plug-in's function icon is not displayed.
A1 : It may take some time for the icon to appear because it takes time to start the plugin. If the icon does not appear after waiting for a while, try restarting the Media Production Suite app.
A2 : The downloaded plugin data may have been corrupted for some reason, preventing the plugin from starting. Follow the steps below to clear the plugin data on your PC, then try downloading again.
- Uninstall the Media Production Suite app from Windows "Apps and Features".
- On the confirmation screen during uninstallation, check "Delete All Downloaded Plugin Data" and click "Uninstall".
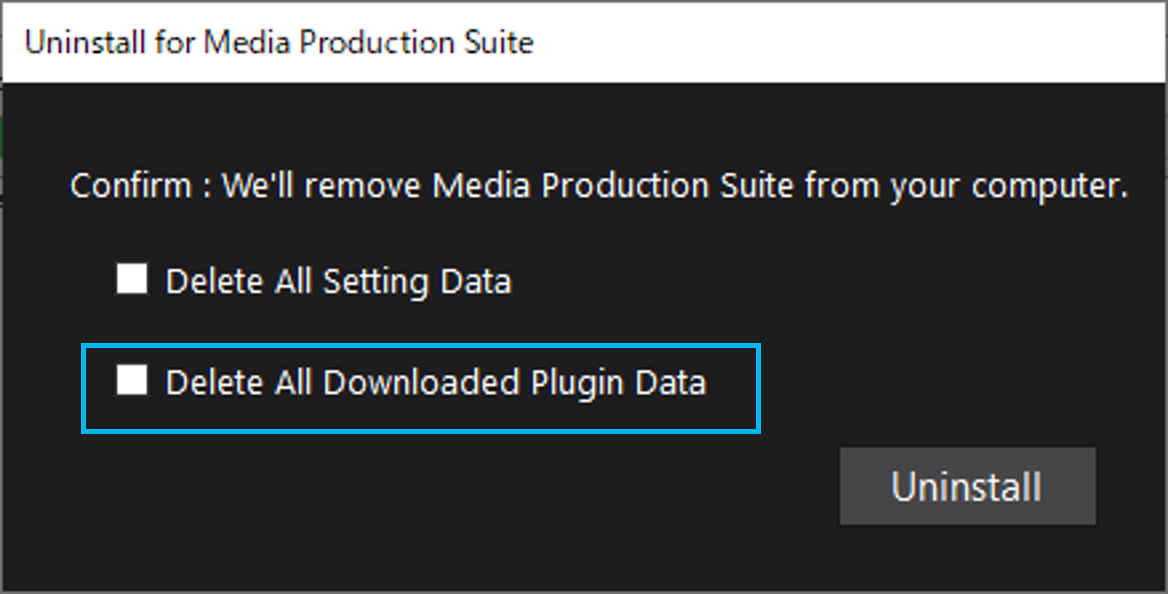
- After the uninstall is complete, reinstall the Media Production Suite app.
- Follow the Manual download instructions for plugin data in the following document to download the plug-in data.
 Plug-in data Manual download and Update procedure
If the plugin function icon does not appear after a while after the download is complete, try restarting the Media Production Suite app.
Sep., 2024 updated
-
19. [Troubleshooting : Plug-ins] When downloading a paid plug-in (such as Video Mixer / Auto Tracking), an error message appears and the download fails.
A1 : Please check that your PC is connected to the Internet.
A2 : Follow the steps below to clear the plug-in data on your PC, then try downloading again.
- Uninstall the Media Production Suite app from Windows "Apps and Features".
- On the confirmation screen during uninstallation, check "Delete All Downloaded Plugin Data" and click "Uninstall".

- After the uninstall is complete, reinstall the Media Production Suite app.
- Follow the Manual download instructions for plugin data in the following document to download the plug-in data.
 Plug-in data Manual download and Update procedure
Sep., 2024 updated
-
18. [Plug-ins] How can I update paid plug-ins (such as Video Mixer / Auto Tracking) when a new version is released?
You can update paid plug-ins while your PC is connected to the Internet.
Please refer to the following procedure.
 Plug-in data Manual download and Update procedure
Sep., 2024 updated
-
17. [Plug-ins] How can I check if a new version of a paid plug-in (such as Video Mixer / Auto Tracking) is available on the Web?
The version of a paid plug-in can be checked on the app while your PC is connected to the Internet.
Please refer to the following procedure.
 Plug-in data Manual download and Update procedure
Sep., 2024 updated
-
16. [Troubleshooting : Plug-ins] I started a trial or activated a paid plug-in (such as Video Mixer / Auto Tracking), but the download of the plug-in data did not complete successfully. What should I do?
Please download the data by following the steps below while your PC is connected to the Internet.
 Plug-in data Manual download and Update procedure
After the download is complete, check that the Plug-in function icon is displayed.
It may take some time for the plugin to start up, so it may take some time for it to appear.
If the plugin function icon does not appear after a while after the download is complete, try restarting the Media Production Suite app.
Sep., 2024 updated
-
15. [Troubleshooting : Plug-ins] The plug-in functions (such as Video Mixer / Auto Tracking) are not enabled.
The data required for the plug-in function may not be installed.
The data required for the plug-in function will be automatically downloaded via the Internet when starting a trial or activating the app for the first time.
However, if the Plug-in license is valid (In Trial, or Activated) at the time Media Production Suite is installed, the data download will not occur automatically.
Please download the data by following the steps below while your PC is connected to the Internet.
 Plug-in data Manual download and Update procedure
After the download is complete, check that the Plug-in function icon is displayed.
It may take some time for the plugin to start up, so it may take some time for it to appear.
If the plugin function icon does not appear after a while after the download is complete, try restarting the Media Production Suite app.
Sep., 2024 updated
-
14. [Troubleshooting] During installation, the message "PostgreSQL installation failed" appears.
Media Production Suite cannot be installed on a computer on which the auto-tracking software (software key AW-SF200/AW-SF100 Web version) is installed.
Please refer to the Operation Manual for more.
Jun., 2024 updated
-
13. [Troubleshooting] The installer cannot be run. "Smart App Control has blocked an app that may not be safe." is displayed.
Please update your OS to the "up to date" using Windows Update.
Please note that Windows Update may need to be executed multiple times.
Run until updates are no longer displayed when you click "Check for updates" on the Windows Update screen.
May, 2024 updated
-
12. What are the activation steps?
The activation procedure is as follows. Information → Software tab → Lisence button → From the license management screen,
enter the company name, country, and license key code → Activation button.
Please also refer to
 Operation Manual (Information function)
May, 2024 updated
-
11. Regarding plug-ins, I have already purchased an existing software key (AW-SF100, SF200, SF300, etc.), do I need to purchase a new one?
If you have already purchased a software key, there is no need to purchase a new one.
If it is installed on your PC, it will be automatically available.
Also, if you change your PC, please deactivate and then activate it.
Please also refer to
 Operation Manual (Information function)
May, 2024 updated
-
10. Can I continue to use existing software such as EasyIP Setup Tool Plus/PTZ Control Center?
The EasyIP Setup Tool Plus and PTZ Control Center software have been integrated into the Media Production Suite.
These previous software can still be used, but future updates will be implemented for the Media Production Suite only.
So we recommend using Media Production Suite for PTZ cameras.
May, 2024 updated
-
9. Regarding plug-ins, if I migrate to Media Production Suite during a free trial of existing software, will the remaining days of the free trial be carried over?
The remaining free trial days of the plug-in applied to the existing software will be carried over.
May, 2024 updated
-
8. What is the maximum settings of camera preset memories function that can be stored ?
Up to 100 settings can be registerd in the preset memories.
Preset memories function is a PTZ camera function, and the camera direction and settings are memorized on the camera side.
Please also refer to
 Operating Instructions of PTZ Cameras
May, 2024 updated
-
7. [Troubleshooting] The application fails to start when clicking the icon, and the initial registration screen does not appear.
Software startup : Double-click the "Media Production Suite" shortcut on the desktop.
Open it in the Windows start menu: "Media Production Suite" → "GUI of Media Production Suite"
In addition, the software required for excecution (Node.js, ErlangOTP, RabbitMQ,PostgreSQL) will also be installed.
Please check whether these software can be used in your PC environment.
May, 2024 updated
-
6. [Troubleshooting] Camera control function on the PTZ Control screen does not work.
• Regarding IP address, port number, user ID, and password,
Please check whether the camera information registered in Media Production Suite matches the information set on the cameras.
• Please check the camera's HTTP port settings. If it overlaps with other equipment, it will need to be changed.
* Setup > Network > Common : HTTP port setting (initial values : 80)
Note that the ports used by Devie View and EasyIP are different.
Please also refer to
 Operation Manual (Setting function)
May, 2024 updated
-
5. Can Media Production Suite be recorded video streaming?
Media Production Suite does not have a recording function.
As an alternative, it supports the RTSP protocol, so you can use separate RTSP-compatible recording software (such as VLC Media Player).
May, 2024 updated
-
4. [Troubleshooting] Unable to connect to cameras. / Cameras are displayed in EasyIP, but cannot be registered in View. / There is no image from the camera.
The IP addresses of the PC and camera must be set on the same network segment.
Please set the IP address so that the PC and camera have different values on the same segment.
May, 2024 updated
-
3. Can Media Production Suite be used on Mac or iPad?
Mac or iPad can be used as a client PC. (When operating from a different device)
The operating environment ofthe Client PC is as follows.
Windows : Windows 11, Windows 10 64bit (Ver. 21H2 or later)
Mac : macOS 13 (Ventura) or later
iPad : iPadOS 16 or later
Display : 1920 x 1080 or higher (iPad : No requirement)
Web Browser : Google Chrome, Microsoft Edge
Please also refer to
 the software overview here.
May, 2024 updated
-
2. Compatible Cameras
The PTZ cameras that can be controlled with Media Production Suite's PTZ Control are as follows.
AW-UE160/163, AW-UE150/155/UN145/HE145, AW-UE100, AW-UE80/83, AW-UE50/53, AW-UE40/43,
AW-UE70/AW-UN70/UE65/UE63,
AW-UE20, AW-UE4, AW-HE70/AW-HN70, AW-HE65/AW-HN65, AW-HE42/AW-HE68/AW-HE75,
AW-HE40/AW-HN40/HE70/HN70/HE65/HN65/HE58/HE48/HN38/HE38/HE35, AW-HE20, AW-UR100, AW-HR140
Please also refer to
 the software overview here.
May, 2024 updated
-
1. Operating environment of PC
The operating environment of the installation PC is as follows.
Please refer to System Requirements for details.
OS : Windows Server 2022, Windows 11, Windows 10 64bit (Ver. 21H2 or later)
CPU : 13th Gen Intel Core i7/i9 or later (For desktop PC, without the suffix F)
GPU Desktop : RTX3070, RTX3070Ti, RTX3080, RTX3080Ti, RTX3090, RTX3090Ti, RTX4070, RTX4070 SUPER, RTX4070Ti, RTX4080, RTX4080 SUPER, RTX4090
GPU Laptop : RTX3080, RTX3080Ti, RTX4080, RTX4090
Memory : 16 GB or more
Storage :16 GB or more
Display : 1920 x 1080 or higher
Web Browser : Google Chrome, Microsoft Edge
SDI Board (Option) : DeckLink 8K Pro (Blackmagic Design), DeckLink Duo2 (Blackmagic Design)
The operating environment of the Client PC is as follows.
Windows : Windows 11, Windows 10 64bit (Ver. 21H2 or later)
Mac : macOS 13 (Ventura) or later
iPad : iPadOS 16 or later
Display : 1920 x 1080 or higher (iPad : No requirement)
Web Browser : Google Chrome, Microsoft Edge
Please also refer to
 the software overview here.
May, 2024 updated
 *For details on how to set up, please refer to the Video Mixer help file (instruction manual) under "PC Hardware Settings" -> "Installation and Settings of Blackmagic SDI Board"