- Top page
- LiveCast Functions
LiveCast Functions
After the initial setup, tap ![]() to display the function selection screen.
to display the function selection screen.
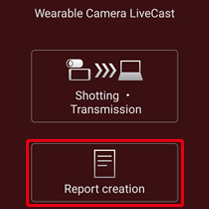
Tap an item to display the video transfer screen (→ Video transfer) or the report list screen (→ Report creation).
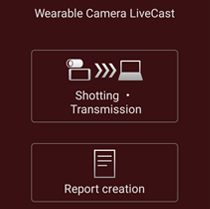
Function selection screen
- Note
- A deletion confirmation screen for imported* videos/still images and reports may be displayed when LiveCast is launched.
* This is a function of the Viewer (Windows) See the Instruction manual of the Viewer for more details.
Image and video transfer
You can use the following functions on the image and video transfer screen (→ Image and video transfer screen).
| Video transfer | : | Transfers videos from the camera over the network. (→ Video transfer) The transferred videos can be displayed on the Viewer. |
|
| Video filming/still image capture | : | Filmed videos and captured still images can be saved in the tablet. (→ Video filming/still image capture) (Videos cannot be saved when only transferred.) |
|
| Still image sharing (sketch share) | : | Still images can be shared with the Viewer. (→ Still image sharing (sketch share)) | |
| Settings | : | You can configure shooting settings and other settings of the camera. (→ Settings) |
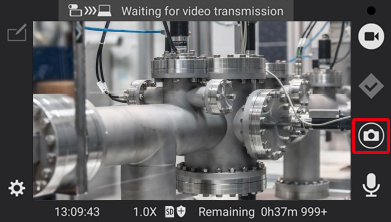
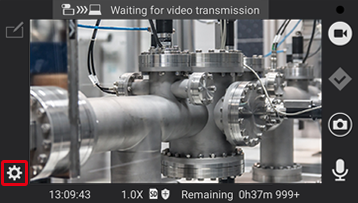
Image and video transfer screen
Example: Screen when a video is being filmed during a transfer
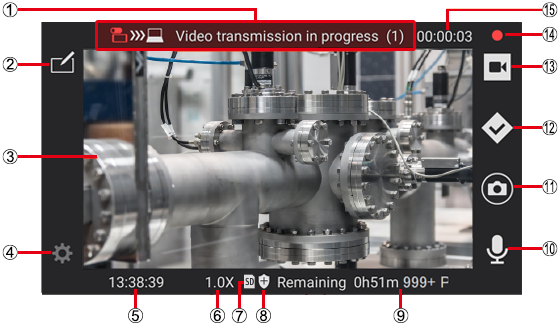
| ① | Video transfer status display (→ Video transfer) | ||||
| : | Waiting for video transmission | ||||
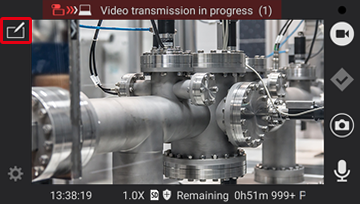
| : | Video transmission in progres (the icon turns red and an animation is displayed. The number in brackets is the number of Viewers receiving the video.) | ||||
| ② | Sketch share button (→Still image sharing (sketch share)) | ||||
| ③ | Camera image | ||||
| ④ | Settings button (→ Settings) | ||||
| ⑤ | Timestamp: The current time | ||||
| ⑥ | Magnification ratio | ||||
| You can change the magnification ratio (x1.0 to x5.0) by pinching in or out. | |||||
| ⑦ | Video save destination (→ Settings) | ||||
| ⑧ | Scrambling setting (→ Settings) | ||||
| ⑨ | Video: Remaining available time for filming. (h for hours and m for minutes)/ Still image: Remaining number of still images that can be taken ([999+] is displayed when more than 1000 images can be taken). |
||||
| ⑩ | Microphone button | ||||
| ⑪ | Still image capture button (→ Video filming/still image capture) | ||||
| ⑫ | Mark button (→ Video filming/still image capture) | ||||
| ⑬ | Video filming button (→ Video filming/still image capture) | ||||
| ⑭ | Filming status display (→ Video filming/still image capture) | ||||
| ● (red): filming, ●(black): filming is paused | |||||
| ⑮ | Filmed time (example: 01:23:34 means 1 hour 23 minutes and 34 seconds) | ||||
Video transfer
You can operate the Viewer to send the videos from the cameras from the LiveCast and display them in the Viewer.
Preparation
- Connect the USB camera to the tablet.
A confirmation screen to allow access to the USB camera is displayed. Tap [OK].
- Tap [Shooting · Transmission] on the function selection screen.
- The video transfer status changes to “Waiting for video transmission” and the video from the camera is displayed.
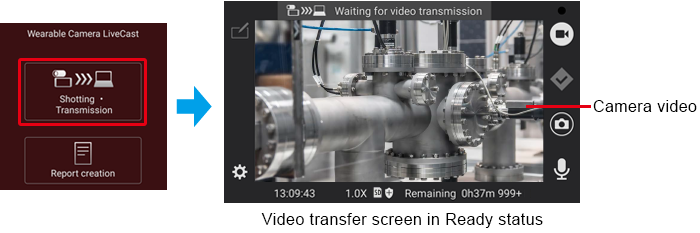
- The video transfer status changes to “Waiting for video transmission” and the video from the camera is displayed.
- (Operation on the Viewer)
Click or tap the thumbnail of the video you want to display.- See the Instruction manual of the Viewer for the more detailed procedure.
- The video transfer status changes to “Video transmission in progress” and the video from the camera is displayed on the Viewer.
- Note
- To end the video transfer, tap
 (return button) twice* to close the application.
*On a tablet (Windows), tap
 .
. - The video from the camera will continue to be transferred even if the LiveCast runs in the background and the tablet is in sleep mode. The battery of the tablet will be consumed even in sleep mode.
Video filming/still image capture
You can capture videos and still images from the camera and save them to the internal storage of the tablet or a microSD card.
Preparation
- Display the video transfer screen in the Ready or Transferring status. (→ Video transfer)
- Video filming
- Tap
 to start filming the video.
- The icon changes to
 , the filming time is displayed, and the filming status changes to ● (red).
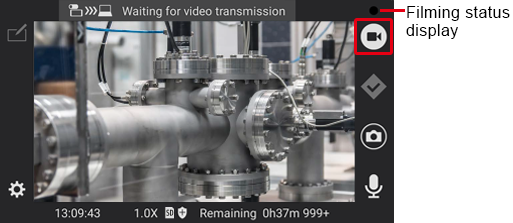

Adding marks While filming, tap  to add a mark to the video at the time the icon was tapped.
When making a report, you will be able to skip parts of the video to go directly to a scene with a mark. (→ Still image selection)A mark is added automatically in the following cases. – When capturing still images – When zooming while filming* * When [Automatic marking of important scenes] is set to ON. (→ General settings)
– When clicking or tapping on in the Viewer - The icon changes to
- Tap to stop filming.
- The icon returns to , the filming time disappears, and the filming status changes to ● (black).
- The icon returns to
- Still image capture
- Tap
 to capture a still image.
- The captured still image is displayed for around 3 seconds at the bottom right of the screen.
- You can capture still images while filming a video.
- Note
- When the surrounding temperature is too high or too low, the temperature of the tablet is also affected.
When the tablet's temperature is too high or too low, a warning message will be displayed, and this application may not operate normally. Additionally, if the tablet's temperature becomes high during video recording, video recording will be stopped and the video recording function will not be available.
Check the temperature range for operation in the operating environment conditions of the instruction manual of your tablet.
Still image sharing (sketch share)
While transferring a video, a still image displayed on the camera can be shared with a Viewer.
You are now able to draw shapes on the shared still image.
Preparation
- Display the video transfer screen in the Transferring status. (→ Video transfer)
- Tap
 .
.- The still image selection/capture screen is displayed.
- The still image selection/capture screen is displayed.
- Note
- The filming will be stopped if a video is currently being filmed. (→ Video filming/still image capture)
- A screen to select the Viewer to use with sketch share is displayed if the video is being transferred to multiple Viewers.
The still image selection/capture screen is displayed after the selection.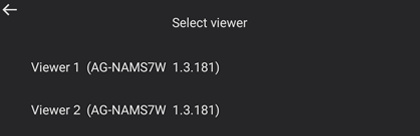
- Tap on an option to select the still image to share.
[Select from folder] : Select a still image from a list of images already captured with the camera (on a still image selection screen). [Shooting with wearable camera] : Capture a still image with the camera. [Shoot with tablet camera] : Capture a still image with the camera at the back of the tablet. 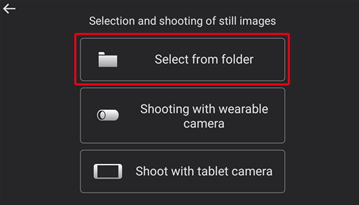
- [Select from folder]
On the still image selection screen, tap the still image you want to share.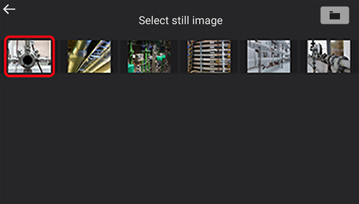
- Note
- The still images saved in the Pictures folder* of the tablet (Android) are displayed on the still image selection screen.
The still image formats (extension) that can be displayed are .jpg and .png.* The images are in the My Pictures folder with tablets (Windows).
- Tap
 to select a still image save folder and change the still image list.
- [Shooting with wearable camera]/[Shoot with tablet camera]
Tap ![]() on the still image capture screen.
on the still image capture screen.
- Tap
 to switch between the wearable camera and the camera at the back of the tablet.
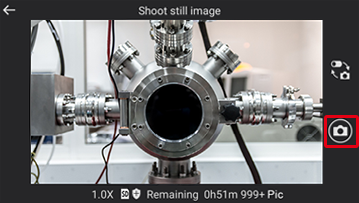
- Draw a shape on the sketch share screen.
- The shapes appear in pink and are also displayed on the Viewer. The shapes drawn in the Viewer are displayed in orange.
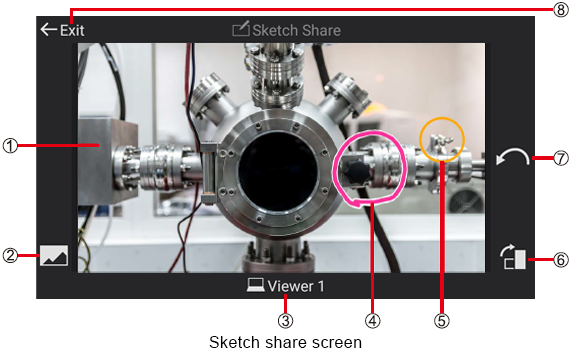
① Still image shared with the Viewer ② Still image selection button Allows you to return to the screen in step 2 (→ Still image sharing (sketch share)) and select or capture a different still image. ③ Name of the Viewer used with sketch share ④ Shape drawn on the camera (pink) ⑤ Shape drawn on the Viewer (orange) ⑥ Still image rotation button Used to change the orientation of the image. ⑦ Sketch cancel button Erases the previously drawn sketch. ⑧ End button - The shapes appear in pink and are also displayed on the Viewer. The shapes drawn in the Viewer are displayed in orange.
- Tap
 to end sketch share.
- The display returns to the video transfer screen.
- Note
- Tap
 to return to the previous screen.
 - When sketch share is ended from the Viewer, a screen to confirm if you want to return to the video transfer screen is displayed.
Tap [Yes] to close the sketch share screen.
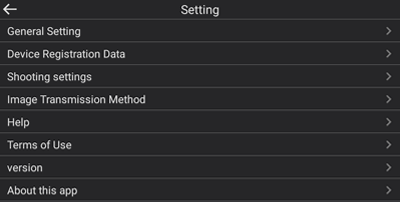
Settings
You can configure the video filming settings, video transfer settings, and other settings.
Preparation
- Display the video transfer screen in the Ready status. (→ Video transfer)
- Tap
 .
. - The settings screen is displayed.
- Select a setting and configure the parameters.
- [Device Registration Data], [Help], [Terms of Use], [version], and [About this app] can only be checked.
- [Device Registration Data], [Help], [Terms of Use], [version], and [About this app] can only be checked.
General Setting
You can configure the camera general settings, such as the video save destination and scrambling.
Tap a setting to configure it. Underlined settings are the default settings.
| [Storage]: Used to configure the save destination for videos, still images, and reports (→ Report function). |
|||
| SD / Internal storage | |||
| [record scramble]: Used to scramble the recorded video and still images. |
|||
| Descrambling requires a Viewer (Windows). | |||
| ON (scrambling used)/ OFF (scrambling not used) | |||
| [Automatic marking of important scenes]: Set whether or not to add marks automatically to indicate important scenes when zooming while filming a video. |
|||
| ON (marks are added)/OFF (marks are not added) | |||
| [Screen off]: | |||
| ・ Tablet (Android) ・ Tablet (Windows) |
: : |
OFF /15 seconds / 30 seconds/ 60 seconds OFF / 60 seconds |
|
| [Language]: Used to set the language of the display. |
|||
| (If a message prompting you to restart the application is displayed after changing this setting, click [Restart].) | |||
| Japanese / English | |||
Device Registration Data
Used to check the application ID, the default P2 Cast [Host name], the user [ID] and [Password] used to log in, and the LiveCast [Nickname].
See “Initial setup” (→ Initial setup) for more details.
Shooting settings
Tap a setting to configure it. Underlined settings are the default settings.
- WAT-02U2D/WAT-03U2D
| [Resolution]: Displays a list of the resolutions of the USB camera supported by the application. |
|||
| ・WAT-02U2D:1920 × 1080 30p / 1280 × 720 30p ・WAT-03U2D:1280 × 960 30p / 1280 × 720 30p |
|||
| [Brightness]: Used to adjust the brightness of the image. |
|||
| Adjust between -128 and 127 on the slider bar. (Tap [Default] to return the setting to the default value of the USB camera. The default value is WAT-02U2D:0 / WAT-03U2D:10.) |
|||
| [White balance]: Configure this setting when the colors do not seem natural. |
|||
Automatic (Tap |
[Backlight Correction]: Makes the screen brighter to make it easier to see when exposed to light from the back of the subject. |
||
| ON (correction on) / OFF (correction off) |
- CX-WE100
| [Resolution]: Displays a list of the resolutions of the USB camera supported by the application. |
|||
| 1920 × 1080 30p / 1280 × 720 30p | |||
| [Maximum ISO sensitivity]: Used to set an upper limit for the ISO sensitivity. |
|||
| 6400 / 12800 | |||
| [White balance]: Configure this setting when the colors do not seem natural. |
|||
| Automatic / Sunny / Cloudy | |||
| [Shake correction]: Used to correct the movements of the image caused by vibrations and oscillations. |
|||
| Maintain level / Lens optical axis center / OFF |
Image Transmission Method
You can configure the transfer destination of the camera videos. Underlined settings are the default settings.
AG-NAMS7 / Other VMS (Not set)
For transfer destinations using a command authentication connection other than AG-NAMS7, tap [Other VMS (Not set)] and configure the following settings. Ask the network administrator for more details.
・ [Viewer's IP address]
・ [Viewer's standby port number (configurable range: 1 to 65535)]
・ [Camera's standby port number (settable range: 1 to 65535)]
Help
Displays the Instruction manual.
Terms of Use
Displays the software usage agreement.
version
Displays the LiveCast product number and version.
About this app
Displays the open-source license.
Report function
This function allows you to add a memo to a still image captured from a video*1 and create a report*2 (up to 100 reports can be created).
The reports are displayed in a list. You may check their content, modify the memo, change the still image, and delete them.
*1 The last video that has been filmed if there is no video the day the report is created.
*2 Reports can also be created for still images captured directly from the camera.
Report creation
- Tap [Report creation] on the function selection screen.
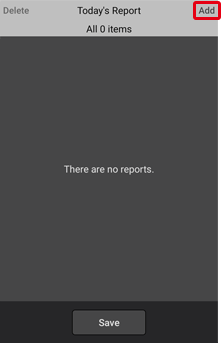
- The report list screen is displayed.
If no report has been created yet, “There are no reports.” is displayed. - Created reports are displayed if you tap [Report creation] within 12 hours after you saved a report (→ Step 4).
- The report list screen is displayed.
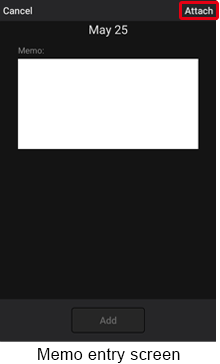
- Tap [Add].
- The memo entry screen is displayed. Select a still image and write a memo.
Select still image :
You can play back and display the videos and still images taken within the day (0:00-23:59) in chronological order and select the still image you want to attach to the report. (→ Still image selection) Memo entry : You can enter a text, such as comments and things to consider, for the still image that has been selected. (→ Memo entry) - A report can be created just by selected a still image or writing a memo.
- The memo entry screen is displayed. Select a still image and write a memo.
- Still image selection
- Tap [Attach].
- The still image selection screen is displayed.
- The still image selection screen is displayed.
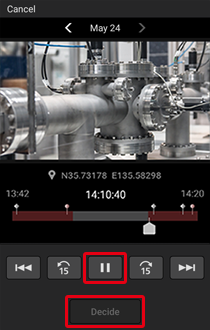
- Tap [▶].
- Videos and still images taken the same day are displayed. The slider on the seek bar shows the time when the video being displayed has been filmed.
Sections where a video has been filmed are shown in reddish brown on the seek bar, while sections where filming has not been performed are shown in gray.
When the slider reaches a ◆ (gray: a mark added to an important scene) (→ Video filming/still image capture)) or a ● (pink: a still image), these symbols change to ◆ (red) and ● (red), respectively. - To create a report for a day other than the current day, tap
 or
or  to select a day, and then tap [▶].
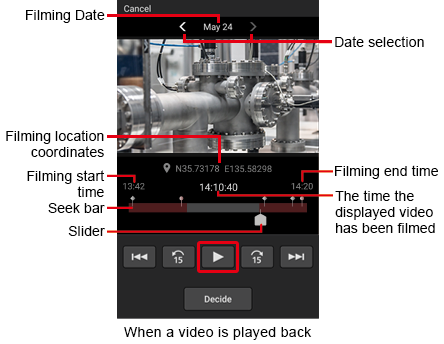
- Operations during playback
– 
: Swipe the slider to adjust the playback position. – 
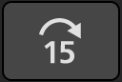
: Used to return 15 seconds before or go 15 seconds further within the video being played. ・ The playback is suspended when the skip destination is one of the following.
- A still image recorded at the same time as the video
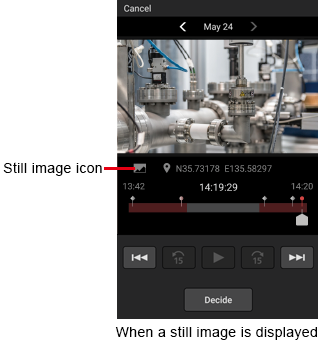
- The end of the video・ These buttons cannot be tapped when a still image is being displayed.
– 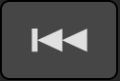
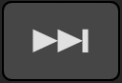
: Used to return to the previous or go to the next ◆ position, return or go to the next still image, or return to the start of the video and suspend the video. ・ Tapping
when a still image captured at the same time as the video is displayed suspends the video on the scene that directly comes after the still image. - Tap [
 ] and then tap [Decide]*.
- The memo entry screen with the still image captured from the video is displayed.
* Tap [Decide] when a still image is displayed.
- Memo entry
- Tap the memo entry field and enter a text.
- Enter a text using the character entry screen that is displayed.

- Enter a text using the character entry screen that is displayed.
- Tap [Add].
- The report is displayed in the list of reports to which still images and/or memos have been added. The list of reports is displayed in chronological order.
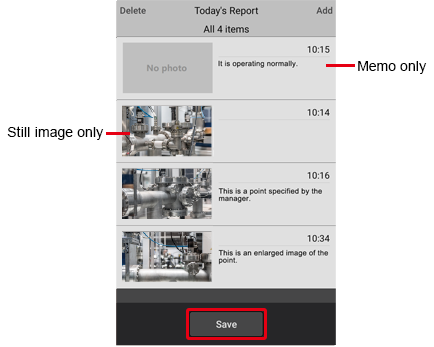
- The report creation time displayed corresponds to the following. Reports created on a day other than the current day show the creation date and time.
– Reports with a still image attached : The time the selected video has been filmed – Report with only a memo : The time [Add] has been tapped 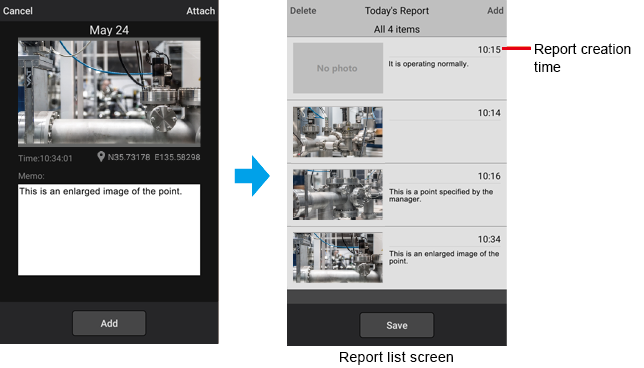
- Tap [Save].
- The created report is saved in the report folder of the camera.
- Note
- Tap [Cancel] to return to the previous screen.
- Tap a report to change the still image or the content of the memo.
Report deletion
Created reports can be deleted.
Preparation
- Display the report list screen. (→ Report creation)
- Tap [Delete], tap the report you want to delete, and then tap [Delete].
- The report deletion screen is displayed after you tapped [Delete].
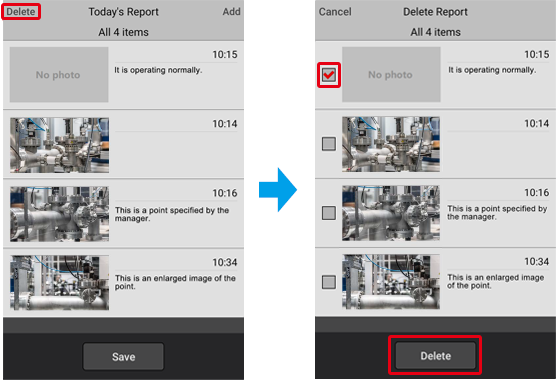
- The report deletion screen is displayed after you tapped [Delete].