- Top page
- Watching camera videos (Windows)
Watching camera videos (Windows)
You can watch videos from the cameras on a computer.
Preparation
- Double-click
 to launch the Liveviewer.
 - Check that the cameras are connected to the network.
(A thumbnail of the camera image is displayed when a camera is connected to the network.) - To add a camera, click the camera selection button. (→ Selecting cameras)
- Drag and drop the thumbnail of the camera you want to display.
- “Connecting XX%” is displayed on the thumbnail.
When the connection is complete, the video from the camera is displayed in the display area and the camera name and information are displayed above the image.
The thumbnail turns reddish brown and “Watching” is displayed. - You can also display the video by clicking on the thumbnail.
- [■] is displayed on the thumbnail when the mouse cursor is placed onto a thumbnail with “Connecting” displayed. Click this icon to cancel the connection.

- “Connecting XX%” is displayed on the thumbnail.
- Click [■] on a thumbnail with “Watching” displayed to end the display of the video.
- [■] is displayed on the thumbnail when the mouse cursor is placed onto it. Click this icon to stop displaying the video.
- Note
- Do not disconnect the headset or microphone and speakers/earphones (or headphones) connected to the computer while a video is being displayed.
Otherwise, a loud sound (noise) may be output.
Filming and setting the camera remotely (Windows)
You can remotely operate the camera from the computer to film videos and capture still images.
|
Make a video from a camera whose image is being displayed. (→ Filming a video remotely) |
|
Take and save still images to a specified folder on the computer. (→ Taking still images remotely) |
|
Configure the shooting and the other settings of the camera. (→ Camera settings) |
Filming a video remotely
Operate the computer to save videos on the camera*.
* The save destination can be either the internal storage of a tablet connected to a USB camera or a microSD card installed to the tablet.
The save destination can be selected on the camera. See the Instruction manual of the Wearable Camera LiveCast for more details.
With AG-WN5K1 cameras, the videos are saved to a microSD card installed to the camera.
Preparation
- Display the video display screen (single screen). (→ Watching camera videos (Windows)
- Click
 .
. - The button changes to
 and the camera starts filming.
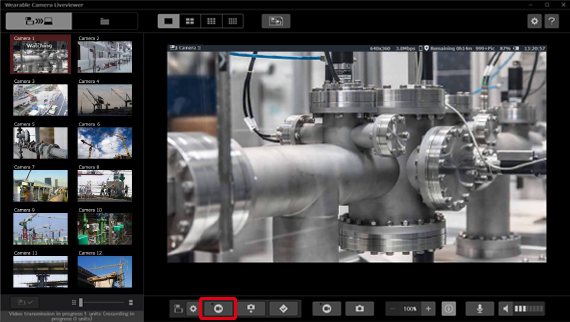
- Note
- During filming, click
 to send an instruction to the camera to add a mark to the video at the time the instruction was sent.
Click this icon when filming is stopped to start filming with the camera and add a mark at the beginning of the video. - Marks cannot be added with AG-WN5K1 cameras.
- Click .
- The button returns to and the filming is stopped.
The video is saved to the camera.
- The button returns to
- Note
- If filming is not possible, check the available space in the microSD card or the internal storage.
- Closing the Liveviewer does not stop the filming. To stop the filming, click or stop the filming operation directly on the camera.
Taking still images remotely
You can take still images while watching the video being displayed from the computer.
The still images taken on the camera are sent to the computer and saved to the specified folder.
Preparation
- Display the video display screen (single screen). (→ Watching camera videos (Windows)
- Click
 .
. - A still image is taken and sent to the computer.
- The still image and a name entry window for the still image save folder are displayed.
The still image is displayed for around 3 seconds at the bottom left of the display area.
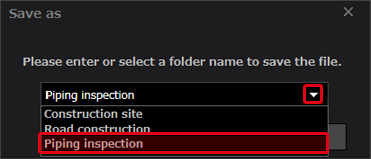
Create a new folder or select an existing folder to save the still image.
- New folder creation
- Enter a folder name and click [Save].
- Existing folder selection
- Click ▼ and then click a folder.
- Click [Save].
- Note
- The still images saved to the computer may differ from the image displayed in the display area due to time lag that may occur depending on the network conditions.
- The still image may not be received depending on the network environment. In such a case, repeat the procedure from step 1.
Camera Settings
Some of the camera settings (shooting settings and video transfer settings) can be configured from the computer while the camera video is being displayed.
Preparation
- Display the video display screen (single screen). (→ Watching camera videos (Windows)
- Click
 .
.- The camera settings screen is displayed.

- The camera settings screen is displayed.
- Select a setting and configure the parameters.
- For details on the configuration procedure, see Shooting settings (→ Shooting settings) and Video transmission settings (→ Video transmission settings).
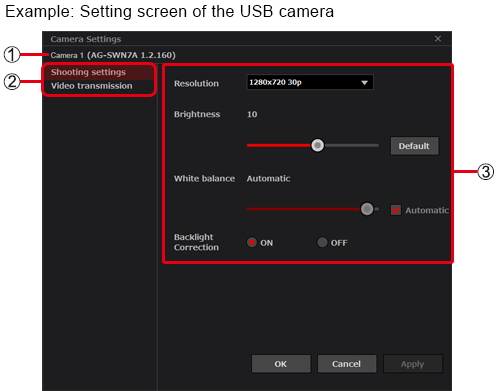
① Camera information*: Camera name (product number, version) * With AG-WN5K1 cameras, only the camera name (product number) is displayed.
② Camera settings: Click a setting to select it. ③ Setting parameters: You can configure the parameters of the setting selected in ②.
- For details on the configuration procedure, see Shooting settings (→ Shooting settings) and Video transmission settings (→ Video transmission settings).
- Click [Apply].
- The modified parameters are applied.
- Click [OK].
- The settings are saved and the camera setting screen closes.
- Note
- Click [Cancel] to close the screen without saving the changes.
Shooting settings
You can change the settings related to shooting and filming.
- WAT-02U2D/WAT-03U2D
| [Resolution]: |
| Used to switch the video quality. Click ▼ and select a setting. (This setting cannot be changed while the camera is filming.) ・WAT-02U2D:1920 × 1080 30p / 1280 × 720 30p ・WAT-03U2D:1280 × 960 30p / 1280 × 720 30p |
| [Brightness]: |
| Used to adjust the brightness of the image. Adjust between -128 and 127 on the slider bar. (Click [Default] to return the setting to the default value of the USB camera. The default value is WAT-02U2D:0 / WAT-03U2D:10.) |
| [White balance]: |
| Configure this setting when the colors do not seem natural. Automatic (Click Manual (Click |
| [Backlight Correction]: |
| Makes the screen brighter to make it easier to see when exposed to light from the back of the subject. ON / OFF |
- CX-WE100
| [Resolution]: |
| Used to switch the video quality. Click ▼ and select a setting. (This setting cannot be changed while the camera is filming.) 1920 × 1080 30p / 1280 × 720 30p |
| [Maximum ISO sensitivity]: |
| Used to set an upper limit for the ISO sensitivity. 6400 / 12800 |
| [White balance]: |
| Configure this setting when the colors do not seem natural. Automatic / Sunny / Cloudy |
| [Shake correction]: |
| Used to correct the movements of the image caused by vibrations and oscillations. Maintain level / Lens optical axis center / OFF |
- AG-WN5K1
| [View angle switching]*1: |
| Used to change the range of subjects displayed on the screen. Click ▼ and select a setting. Wide / Standard / Narrow |
| [Time stamp]*1: |
| Used to display the date and time on the image. ON / OFF |
| [White balance]*2, 3: |
| Configure this setting when the colors do not seem natural. AWB (Automatically adjust white balance.) / Sunny / Cloudy / Indoor 1 / Indoor 2 / Fluorescent light / User setting |
| [Backlight Correction]*2, 3: |
| Makes the screen brighter to make it easier to see when exposed to light from the back of the subject. ON / OFF |
| [Color Night View]*1: |
| Used to take bright video in color even in dark places. ON / OFF |
| [Shutter speed]*3: |
| Sets the shutter speed. Click ▼ and select a setting. Auto / 1/250 / 1/500 / 1/1000 / 1/2000 / 1/4000 |
※1 Setting condition: When the shooting mode is set to normal mode.
※2 Setting condition: When the shooting mode is set to normal mode and [Color Night View] is set to [OFF].
※3 Setting condition: When the shooting mode is set to slow-motion mode.
Video transmission settings
You may change the video transfer settings.
When the display or a video from a camera starts, the settings of [Video transmission] (→ Video transmission) in the Viewer settings are applied.
| [Maximum resolution]: |
| Set a maximum for the video resolution. Click ▼ and select a setting. 1920[FHD] / 1280[HD] / 640[VGA] / 320[QVGA] |
| [Maximum bit rate]: |
| Set a maximum for the video bit rate. Click ▼ and select a setting. 10 Mbps / 5 Mbps / 3 Mbps / 1 Mbps / 512 kbps / 256 kbps |
| [priority of Image quality and motion]: |
| Control the video prioritizing quality or motion. [Image quality priority]: The quality (resolution) is prioritized over the motion (frame rate). [Motion priority]: The motion (frame rate) is prioritized over the quality (resolution). |
Recording videos on the computer (Windows)
You can record videos being displayed or still images (→ Saving still images from the video being displayed) from a video being displayed to the computer.
Precautions when recording to a computer
The recording may be suspended depending on factors such as the available space in the save destination and the communication environment.
For long recording, check the remaining space in the save destination and that the communication environment is stable.
Recording a video being displayed
The videos being displayed can be saved to a specified folder in the mp4 format.
Preparation
- Display the video display screen (single screen). (→ Watching camera videos (Windows)
- Click .
- The video is recorded to the computer. The button changes to .
- When recording a video, the thumbnail turns reddish brown* and “Recording” is displayed.
* When the video from a different camera is displayed during recording, only the frame of the thumbnail is reddish brown.
- A name entry window for the recorded video save folder is displayed.
Create a new folder or select an existing folder.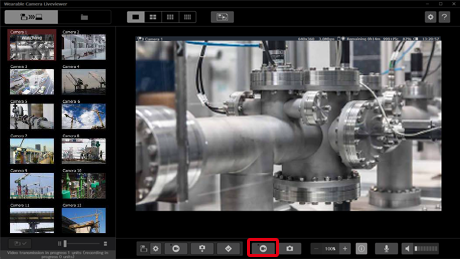
- The video is recorded to the computer. The button changes to
- Note
- Click during a recording to add a mark to the video at the time the icon was clicked.
- New folder creation
- Enter a folder name and click [Save].
- Existing folder selection
- Click ▼ and then click a folder.
- Click [Save].

- Click .
- The recording to the computer stops and the video is saved to the folder. The button returns to .
- [■] is displayed on the thumbnail when the mouse cursor is placed onto a thumbnail with “Recording” displayed.
The recording can also be stopped by clicking [■].
- The recording to the computer stops and the video is saved to the folder. The button returns to
- Note
- Approximately 149 hours of video can be recorded to an HDD of 500 GB.
(When recording the video from one camera with 1920 [FHD] or 1280 [HD] set for the max resolution and 10 Mbps for the max bit rate in the Video transmission settings.)
The recording time under real usage conditions may vary depending on the subject and the communication environment.
Saving still images from the video being displayed
Parts of the videos being displayed can be saved to a specified folder as still images in the JPEG format.
Preparation
- Display the video display screen (single screen). (→ Watching camera videos (Windows)
- Click
 .
.- A still image is captured from the video.
- The captured still image and a name entry window for the still image save folder are displayed.
The still image is displayed for around 3 seconds at the bottom right of the display area.
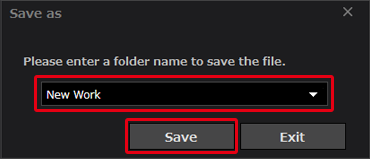
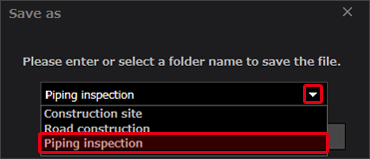
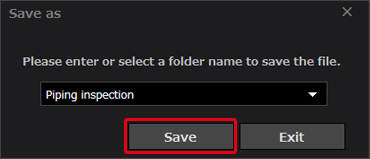
Create a new folder or select an existing folder to save the still image.
- New folder creation
- Enter a folder name and click [Save].
- Existing folder selection
- Click ▼ and then click a folder.
- Click [Save].
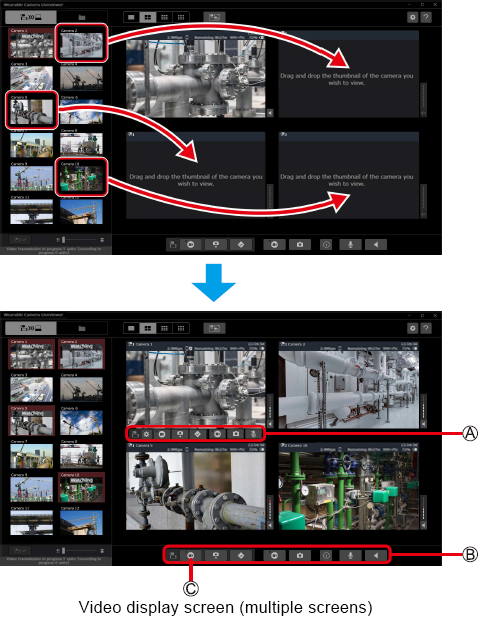
Switching to multiple-screen display (Windows)
You can watch videos from multiple cameras on a single computer.
The display area can be divided into a multi-screen area composed of 4, 9 or 12 screens. The explanations are given for a 4-screen display.
Preparation
- Display the video display screen (single screen). (→ Watching camera videos (Windows)
- Click
 .
.- The video currently displayed appears on the top left screen, while the other three screens are left black.
- You can click
 to display 9 screens or
  to display 12 screens.

- Drag and drop the thumbnail of the camera you want to display into the desired screen location.
- The thumbnail you dragged and dropped turns reddish brown and “Watching” is displayed.
- You can click the thumbnail to change its position in order from the screen at the top left to the screen at the bottom right.
- Note
- You cannot zoom in or out with multiple-screen display.
- The following information is not displayed.
- Resolution
- With 9-screen display: the remaining number of still images that can be taken
- With 12-screen display: the remaining available time for filming and the remaining number of still images that can be taken - Move the mouse cursor onto the multiple-screen to display the
 buttons.
- The buttons are effective for the screen onto which the mouse cursor has been moved.
- The sound volume of the screen onto which the mouse cursor has been moved is louder than the volume of the other screens.  buttons are effective for all four screens.
- For example, clicking ( ) will start filming with up to four cameras being displayed at once.
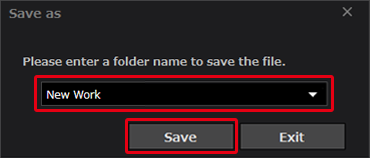
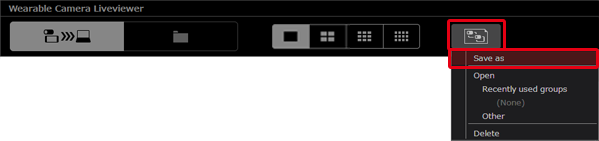
Creating display groups (Windows)
You can register the currently displayed screens into a group* to be able to switch to the screens displayed at the time of registration just by selecting a group.
Up to 50 display groups can be registered.
* You can also register a single screen. To do so, register a group after displaying a single screen.
Preparation
- Display the video display screen (single screen or multiple screens). (→ Watching camera videos (Windows), → Switching to multiple-screen display (Windows))
- Click
 and then click [Save as].
- An entry screen for the display group name is displayed.
- An entry screen for the display group name is displayed.
- Enter a group name and click [Save].
- After the registration, the group name and the number of cameras are displayed under [Recently used groups] and on the display group selection screen (→ Selecting a display group).
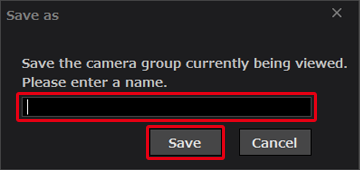
- After the registration, the group name and the number of cameras are displayed under [Recently used groups] and on the display group selection screen (→ Selecting a display group).
Selecting a display group
Select a display group to display the videos from the registered cameras.
Preparation
- Display the video display screen (single screen or multiple screens). (→ Watching camera videos (Windows), → Switching to multiple-screen display (Windows))
- Click and then click [Other].
- The display group selection screen, which is divided into categories depending on the number of screens, is displayed.
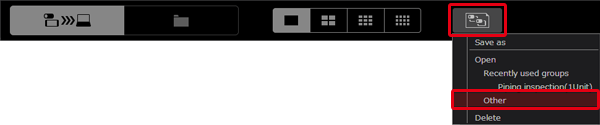
- The display group selection screen, which is divided into categories depending on the number of screens, is displayed.
- Click on a display group and click [Select].
- The display switches to the registered camera videos.
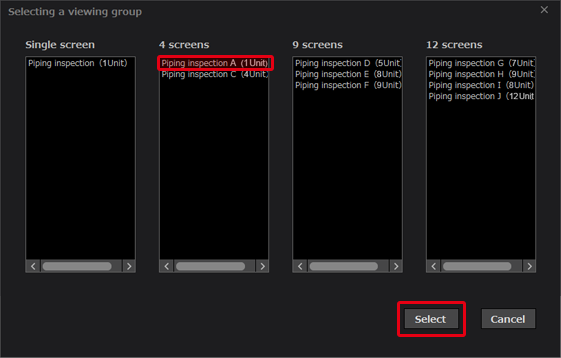
- The display switches to the registered camera videos.
- Note
- Up to five recently created or selected display groups are displayed under [Recently used groups].
You can also switch to a registered display by clicking a displayed group.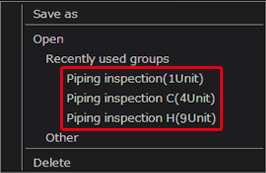
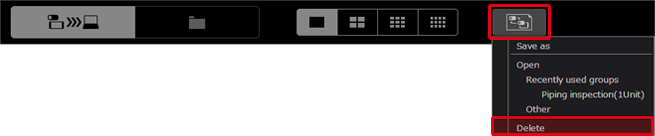
Deleting a display group
You can delete a registered group.
Preparation
- Display the video display screen (single screen or multiple screens). (→ Watching camera videos (Windows), → Switching to multiple screen display (Windows))
- Click and then click [Delete].
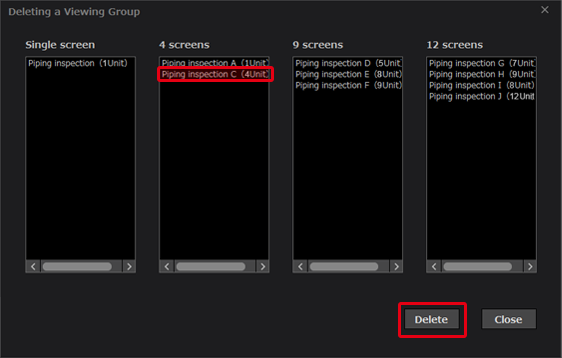
- The deletion screen for display groups is displayed.
- The deletion screen for display groups is displayed.
- Click on the name of the group you want to delete and then click [Delete].
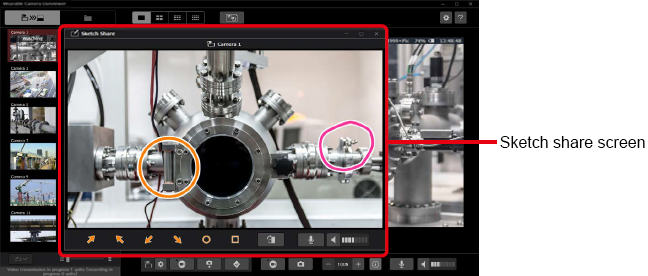
Sharing still images (sketch share) (Windows)
While a video is being displayed, you can share a still image selected on the camera* with the Liveviewer.
Select the still image you want to share on the camera to display it on the sketch share screen.
You are now able to draw shapes on the shared still image.
* The sketch share function is not available with AG-WN5K1 cameras.
Preparation
- Display the video display screen (single screen or multiple screens). (→ Watching camera videos (Windows), → Switching to multiple screen display (Windows))
- Wait for the sketch share instruction from the camera.
- When a still image is displayed on the camera, the sketch share screen is displayed in a different window.
- When a still image is displayed on the camera, the sketch share screen is displayed in a different window.
- Click on a graphic tool (④ or ⑤) and then click on the sketch share screen.
- The selected shape appears in orange and is also displayed on the sketch share screen on the camera side.
The shapes drawn on the camera side are displayed in pink. - You can click on a shape drawn on the Viewer and drag any of its corners to adjust the size of the shape.
- You can click the shape and press the "Delete" key to delete it.

① Name of the camera whose image is displayed in the sketch share screen ② Still image being shared ③ Shape drawn on the Liveviewer (orange) ④ Arrow tools ⑤ Circle and square tools ⑥ Rotate the still image 90° clockwise ⑦ Microphone button:  : the sound is sent from the computer,
  : the sound is not sent
⑧ Volume button:  : the sound from the camera is output,
  : the sound from the camera is not output (the sound from the camera is displayed as
  .)
.)⑨ Shape drawn on the camera (pink) - The selected shape appears in orange and is also displayed on the sketch share screen on the camera side.
- Exit sketch share.
- Click
 to display a confirmation screen to save the shared still image.
Perform one of the following actions to close the sketch share screen. - The confirmation screen is also displayed when sketch share is ended on the camera.
– Enter the name of the save destination folder or select a folder, and then click [Save]. – Click [Exit]. - Click
- Note
- Multiple sketch share screens open if still images from multiple cameras are shared while displaying the video display screen (multiple screens) (→ Switching to multiple-screen display (Windows)).
Viewer Settings (Windows)
You can configure the Liveviewer settings.
Preparation
- Display the video display screen (single screen or multiple screens). (→ Watching camera videos (Windows), → Switching to multiple screen display (Windows))
- Click .
- The Viewer settings screen is displayed.

- The Viewer settings screen is displayed.
- Select a setting and configure the parameters.
- The General Setting, Connection Settings, Video transmission, and Record settings to PC can be configured.
You can also check the device registration and version information.
See → General Setting to version for details on the setting and check procedures.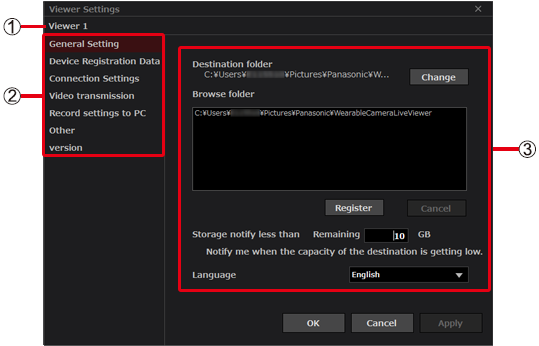
① Liveviewer information : Liveviewer name ② Viewer settings : Click a setting to select it. ③ Setting parameters : You can configure the parameters of the setting selected in ②. - The General Setting, Connection Settings, Video transmission, and Record settings to PC can be configured.
- Click [Apply].
- The configured parameters are applied.
- Click [OK].
- The settings are saved and the Viewer settings screen closes.
- Note
- Click [Cancel] to close the screen without saving the changes.
General Setting
You can configure the general settings of the Liveviewer, such as the data save destination.
[Destination folder]:
Folder used to save the videos recorded to the computer and the data imported from the camera (→ Importing data).
You can change the default save destination*.
*C:/Users/User name/Pictures/Panasonic/WearableCameraLiveViewer
- Click [Change].

- Select a save destination and click [OK].
- A folder with the application name is automatically created after you have configured a save destination.
- More precisely, the files are saved in the WearableCameraLiveViewer/20xx/xx/xx/ subfolder.
- The folders with the date are created automatically when the data is recorded or imported to the computer.
- Note
- The save folder that has been set as the destination is automatically registered in the browse folders (→ [Browse folder]).
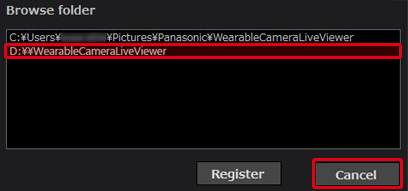
[Browse folder]:
Folders used to display the data on the content management screen (→ Content management (Windows)).
You can register and delete browse folders.
- Folder registration
There are two methods to register a folder. Automatic registration does not require any operation.
- Automatic registration: When the save folder is modified, it is automatically added to the browse folders.
- Manual registration: The specified folder is registered to the browse folders.
- Click [Register].
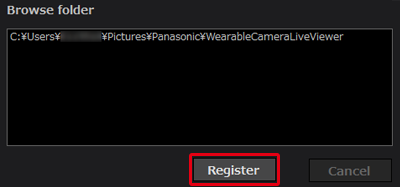
- Select a browse folder and click [OK].
- The specified browse folder is either or in the example below.:
Parent folder of the folder with the application name* :Folder with the application name* * Parent folder of the folders with the date

- The specified browse folder is either
- Click [Register].
- Folder deletion
- Click the path of the folder you do not need anymore and click [Cancel].
- Note
- The browse folder with the same path as the save folder cannot be deleted.
[Storage notify less than]:
- Enter a value (between 1 and 99) for the remaining space at which to send a notification.
- A notification is sent when the space available for recording in the save destination reaches the set value.
Click [Confirm] and follow the on-screen instructions. - Default value: 10 GB

- A notification is sent when the space available for recording in the save destination reaches the set value.
[Language]:
- Click▼and select [Japanese] or [English].
- Default value: The default value is dependent on the PC's display language. The default value is [English] when set to a language other than Japanese.

- Default value: The default value is dependent on the PC's display language. The default value is [English] when set to a language other than Japanese.
- When a message requesting for restart is displayed, click [Restart].
Device Registration Data
Used to check the application ID, the default P2 cast [Host name], the login user [ID] and [Password], and the Liveviewer [Nickname].
See “Initial setup” (→ Initial setup) for more details.
Connection Settings
You can change the communication port in these settings if communication is not possible with the port number assigned automatically due to problems in the network environment. Configure the settings following the instructions of the network administrator.
Underlined settings are the default settings.
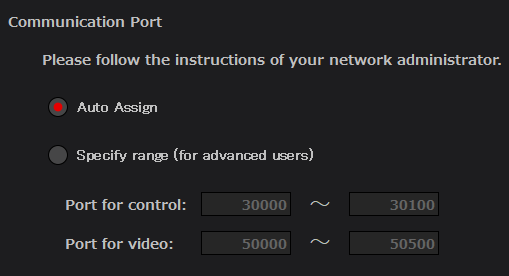
[Auto Assign]:
The port number is assigned automatically.
[Specify range (for advanced users)]:
Enter the upper limit and lower limit for [Port for control] and [Port for video].
Delete the values and enter values in the range of 30000 to 65535. The ranges should not overlap.
Video transmission
You can configure the settings used when video transfer starts from a camera.
Underlined settings are the default settings.
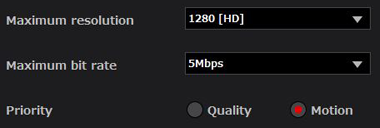
[Maximum resolution]:
Set a maximum for the video resolution. Click ▼ and select a setting.
1920[FHD] / 1280[HD] / 640[VGA] / 320[QVGA]
[Maximum bit rate]:
Set a maximum for the video bit rate. Click ▼ and select a setting.
10 Mbps / 5 Mbps / 3 Mbps / 1 Mbps / 512 kbps / 256 kbps
[Priority]:
Control the video prioritizing quality or motion.
[Quality]: The quality (resolution) is prioritized over the motion (frame rate).
[Motion]: The motion (frame rate) is prioritized over the quality (resolution).
Record settings to PC
You can choose whether or not to record the sound from the computer when recording a video being displayed to the computer.
Underlined settings are the default settings.

| [ON]: | |
| The sound from the computer is recorded. | |
| [OFF]: | |
| The sound from the computer is not recorded. | |
Other
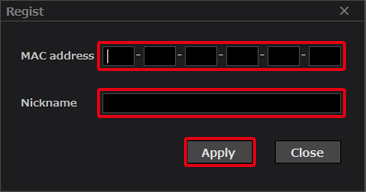
With AG-WN5K1 cameras, it is possible to make demands for device registration from the Liveviewer.
- Click [Regist].
- The new registration screen is displayed.

- The new registration screen is displayed.
- Enter the MAC address and the nickname of the camera and click [Apply].
- See the AG-WN5K1 manual for details on how to check the MAC address.
- Enter a nickname of a maximum of 64 characters.
- A message confirming that the registration demand has been completed is displayed.
- Click [Confirm].
- The device registration demand will have to be accepted by the P2 Cast administrator.
Registration demands for AG-WN5K1 cameras made on P2 Cast are accepted.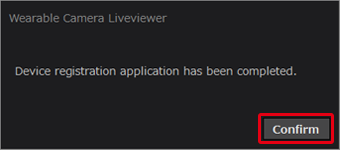
- The device registration demand will have to be accepted by the P2 Cast administrator.
- Request a device registration to the P2 Cast administrator in P2 Cast.
- See the P2 Cast Instruction manual for the device registration procedure
- After the registration has been accepted on P2 Cast, you can copy the LicenseFile.bin file*2, which has been created when registering a camera in the Multi Viewer Software AG-NAMS5*1 (from Panasonic Corporation), to the folder below to be able to display videos from AG-WN5K1 cameras.
C:/ProgramData/Panasonic/MultiViewerSoftware*1 Refer to the AG-NAMS5 manual.
*2 The LicenseFile.ssl file is required with the Liveviewer (Android). Use the tool provided by Panasonic Corporation to convert the LicenseFile.bin file and copy the file to the folder below.
Internal storage/Panasonic/MultiViewerSoftware
version
Displays the product number and version of the Liveviewer.