- Top page
- Content management (Windows)
Content management (Windows)
The content management screen is made of the recorded data and the report data windows.
|
: | In this window, you can check the videos and still images recorded to the computer or imported from the cameras (→ Importing data). |
|
: | In this window, you can check report data imported from the cameras. (→ Report data window) |
Recorded data window
- Click
 .
.- The recorded data window is displayed. The thumbnails of the files in the previously checked folder are displayed.
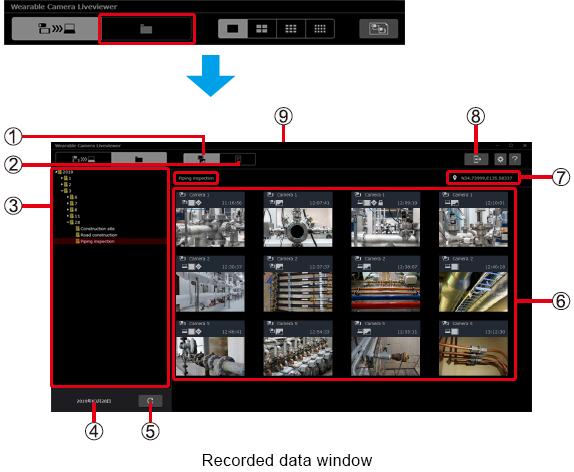
① Recorded data window button ② Report data window button ③ Folder area: ・ The folders and subfolders with the date are displayed. 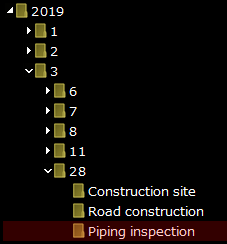
④ Date of the selected folder ⑤ Refresh button: ・ Refreshes the screen display. ⑥ Thumbnails of the videos and the still images: ・ The thumbnails are displayed in chronological order from the file recorded (started) first.
・ The size of the thumbnails cannot be changed.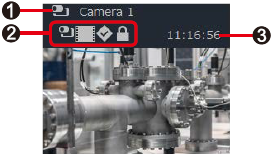

Camera icon and name of the camera used for the recording 
Icons added to the file: 
: Video imported from the camera
(→ Importing data)
: Still image imported from the camera
(→ Importing data)
: Video recorded to the computer
(→ Recording a video being displayed)
: Still image received from the camera (→ Taking still images remotely) and still image recorded to the computer (→ Saving still images from the video being displayed) 
: File with a mark 
: Protected file
(→ Protecting files from accidental deletion (protection))
Filming start time (video)/Shoot time (still image) ⑦ Recorded data location information: ・ Displays the valid location information of the data saved in the selected folder.
・ “--- ---” is displayed when there is no location information.⑧ Import button: ・ Used to import data saved on the camera to the computer. (→ Importing data) ⑨ Name of the selected folder
Checking recorded data
You can select a folder and check a video or a still image.
- Click .
- The recorded data window is displayed.
- Select the folder that contains the file you want to check.
- The thumbnails of the files in the selected folder are displayed.
- The thumbnails of the files in the selected folder are displayed.
- Note
- Right-click on a thumbnail to perform an action such as playback or deletion.
Playing back recorded data (single-screen playback)
You can play back one day of data recorded from a camera.
Preparation
- On the recorded data window, select the folder that contains the file you want to play back. (→ Checking recorded data)
- Right-click on the thumbnail of the file you want to play back and then click [Playback].
- The playback screen opens in a different window and one day of recorded data from the camera is played back. The playback is suspended when a still image is displayed.
The selected thumbnail turns reddish brown and “During playback” is displayed. - You can also double-click on a thumbnail to start the playback.
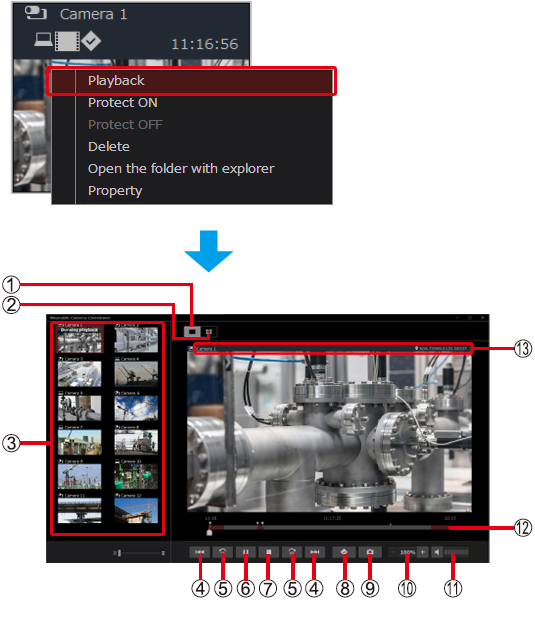
① Single-screen playback button ② 4-screen playback button: ・ Files with the same date and time recorded from multiple cameras can be played back at the same time. (→ Playing back recorded data (4-screen playback)) ③ List of cameras with files saved in the same folder as the selected thumbnail: ・ Thumbnails of the videos and still images recorded first the same day are displayed.
・ The following icons are displayed at the left of the camera name. : Video or still image taken on the camera.
 : Video or still image recorded to the computer.
④ Skip buttons : Used to return to the previous mark or go to the next mark location (gray ◆), return or go to the next still image, or return to the start of a video and pause the video. ・ Clicking
 when a still image captured at the same time as the video is displayed pauses the video on the scene that directly comes after the still image.
⑤ 15-sec skip buttons : Used to return 15 seconds before or go 15 seconds further within the file. ・ The playback is paused when the skip destination is one of the following. - A still image recorded at the same time as the video
- The end of the video・ These buttons cannot be clicked when a still image is being displayed. ⑥ Pause button : Click this button during playback to pause it.
・ During a pause, the button changes to [▶]. Click on it to resume the playback.
・ This button cannot be clicked when a still image is being displayed.⑦ Stop button : The slider returns to the start time of the filming of the day, and the playback of all files stops. ⑧ Mark button : Used to add a mark (◆ (grey) or ● (pink)) to the video or the still image being displayed.
・ You can click on a mark location to delete the mark.⑨ Still image save button : Saves a frame of the video as a still image. ⑩ Zoom buttons :  : zoom in,
  : zoom out. The magnification ratio is displayed between and .
Each click on a button changes the magnification ratio by 50% in the range of 100% to 500%.
You can also change the magnification ratio by rotating the scroll wheel while keeping the "Ctrl" key pressed.⑪ Volume button :  : the sound from the camera is output,
 : the sound from the camera is not output
(the sound from the camera is displayed as
 .)
.)⑫ Seek bar : The sections of the seek bar where a video has been filmed are shown in reddish brown, while the sections where no video has been filmed are shown in gray. The playback time is displayed on the position of the slider.
・ Drag the slider to adjust the playback position.・ When the slider reaches a mark ◆ (gray) or ● (pink), the mark changes to ◆ (red) or ● (red), respectively.

 Note
Note
- When the playback screen is switched or when a different thumbnail is played back, the playback may start from the middle of the seek bar.
⑬ Name of the camera whose video is being played back and filming location information
- The playback screen opens in a different window and one day of recorded data from the camera is played back. The playback is suspended when a still image is displayed.
- Click [■].
- The slider returns to the start time of the filming of the day, and the playback of all files stops.
Playing back recorded data (4-screen playback)
Files with the same date and time recorded from multiple cameras can be played back at the same time. Explanations are given for when all the four screens are used for playback.
Preparation
- Play a file on one screen. (→ Playing back recorded data (single-screen playback))
- Click
 .
.- The file being played back appears on the top left screen, while the other three screens are left black.

- The file being played back appears on the top left screen, while the other three screens are left black.
- Drag and drop the thumbnail of the file you want to play into the desired screen location.
- The thumbnail turns reddish brown, “During playback” is displayed on it, and the data filmed with the camera is played back.
- The seek bar for 4-screen playback combines the seek bars of the four cameras (→ Seek bar).
- You can click the thumbnails to place them in order from the screen at the top left to the screen at the bottom right and start the playback.
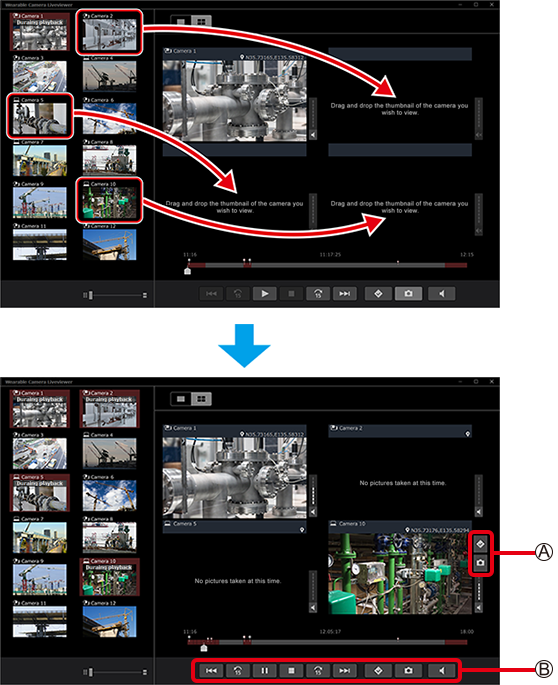
- Note
- You cannot zoom in or out during 4-screen playback.
- When returning to single-screen playback, the screen displayed is the screen at the top left in 4-screen playback.
- Move the mouse cursor onto any of the four screens to display the
 buttons.
- The
buttons are effective for the screen onto which the mouse cursor has been moved.- The sound volume of the screen onto which the mouse cursor has been moved is louder than the volume of the other screens.
 buttons are effective for all four screens.
- Click
 to save up to four still images to the folder that has been created.
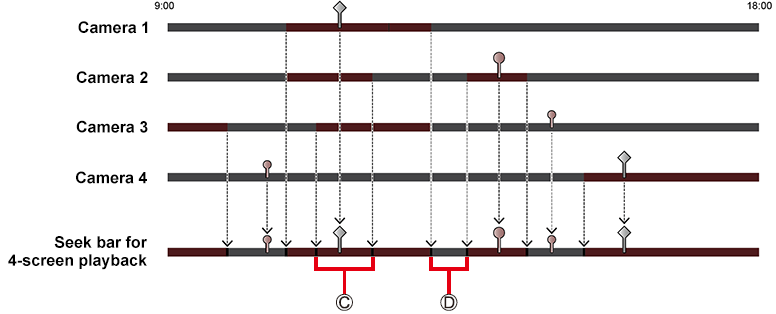
- Seek bar
Example: The cameras 1 to 4 have filmed from 9:00 to 18:00 (9:00 am to 6 pm).
- The three following colors are displayed on the seek bar. The explanations specific to the example are given in the brackets.
Reddish brown: Sections where any of the cameras has filmed ( : Recorded data from cameras 1 to 3 is being played back.)
Gray: Sections where none of the cameras has filmed ( : There is no data to play back on all four screens (black screens are displayed).)
Black: Separations in videos - The positions of still images and marks added to the recorded data from cameras 1 to 4 are also displayed.
- Click [■].
- The slider returns to the start time of the filming of the day, and the playback of all files stops.
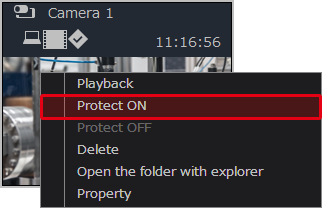
Protecting files from accidental deletion (protection)
Each file can be protected against accidental deletion.
Preparation
- On the recorded data window, select the folder that contains the file you want to protect. (→ Checking recorded data)
- Right-click on the thumbnail of the file you want to protect and then click [Protect ON].
- is displayed on the thumbnail.
- Multiple files can be protected at once by clicking on multiple thumbnails while keeping the "Ctrl" key pressed before performing the action in step 1.
- Note
- To remove the protection, right-click on a protected thumbnail and click [Protect OFF].
- Protected files cannot be deleted from the Liveviewer. Remove the protection to delete them.
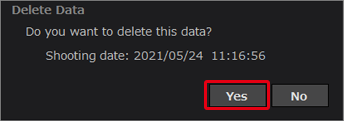
Deleting recorded data
Data can be deleted.
Preparation
- On the recorded data window, select the folder that contains the file you want to delete. (→ Checking recorded data)
- Right-click on the thumbnail of the file you want to delete and then click [Delete].
- Multiple files can be deleted at once by clicking on multiple thumbnails while keeping the "Ctrl" key pressed before performing the action in step 1.

- Multiple files can be deleted at once by clicking on multiple thumbnails while keeping the "Ctrl" key pressed before performing the action in step 1.
- Click [Yes].
- Note
- Deleted files cannot be restored.
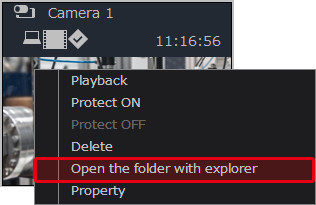
Displaying recorded data in the explorer
Recorded data in a folder can be displayed in the explorer.
Preparation
- On the recorded data window, select the folder that contains the file you want to display. (→ Checking recorded data)
- Right-click on the thumbnail of the file you want to display and then click [Open the folder with explorer].
- The explorer is launched and the recorded data inside the folder is displayed.
- The explorer is launched and the recorded data inside the folder is displayed.
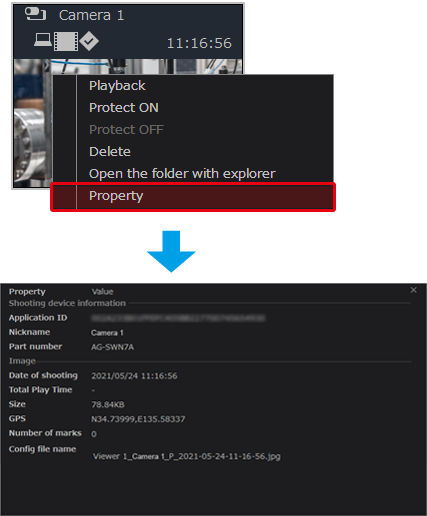
Checking the recorded data information (properties)
You can check the details of the recorded data (product number of the camera, recorded date, etc.).
Preparation
- On the recorded data window, select the folder that contains the file for which you want to check the information. (→ Checking recorded data)
- Right-click on the thumbnail of the file for which you want to check the information and then click [Property].
- Note
- When a video or still image taken from an AG-WN5K1 camera has been imported, the four pieces of information are displayed as follows.
– Application ID : – – Nickname : The volume ID of the microSD card inserted into the camera.
– GPS : “--- ---” is displayed for files saved in newly created folders.
The location information saved in the management file inside the folder is displayed for files saved in existing folders.– Number of marks : 0
Report data window
In this window, you can check the report data imported from the camera* (→ Importing data).
The report data is created on the camera. See the Instruction manual of the Wearable Camera LiveCast for more details.
* It is not possible to check the report data with AG-WN5K1 cameras.
Preparation
- On the recorded data window, select the folder that contains the file for which you want to check the information. (→ Checking recorded data)
- Click
 .
.- The report data window is displayed.
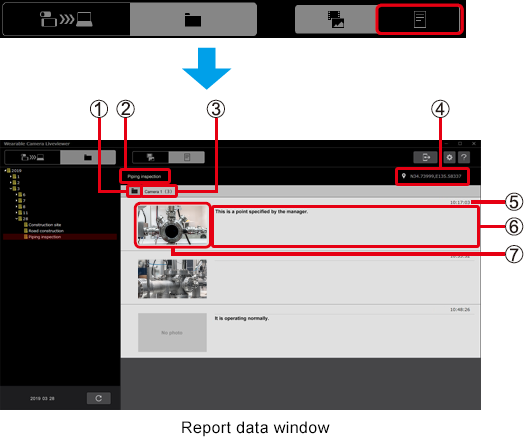
① Explorer launch button: ・ Click this button to launch the explorer and display the data inside the folder. ② Name of the selected folder ③ Name of the camera where the reports have been created and number of reports ④ Recorded data location information ⑤ Still image shooting time: ・ When there is no still image attached, the creation time of the text memo is displayed. ⑥ Text memo added to the report ⑦ Still image attached to the report: ・ The size of the thumbnails cannot be changed.
・ “No photo” is displayed when no still image has been attached. - The report data window is displayed.
- Note
- Reports with no memo input are displayed with still images only, and reports with no still image attachments are displayed with only a memo.
Importing data
Videos, still images, and report data saved in a camera can be imported into a computer.
Preparation
- Display the recorded data window. (→ Recorded data window)
- Insert the microSD card into the computer.
- It may be necessary to use a dedicated adapter.
- Note
- With tablets (Android), you can also import data by connecting it to the computer using a commercially available USB cable*.
* It may be necessary to select the USB function on the tablet.
- It may be necessary to use a dedicated adapter.
- Click
 .
. - The camera data import screen is displayed.

- Configure the settings and click [Import].
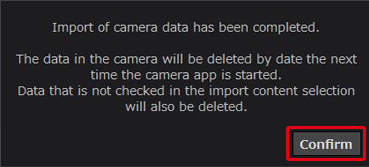
- When [Delete] is selected in ⑤, a message indicating that the imported data will be deleted the next time the camera will be turned on is displayed after clicking [Import]. Click [OK]. The import starts after you clicked the button.
- The progress window is displayed. A completion window appears when the import is complete.
To suspend the import, click [Cancel] on the progress window, and then click [Confirm].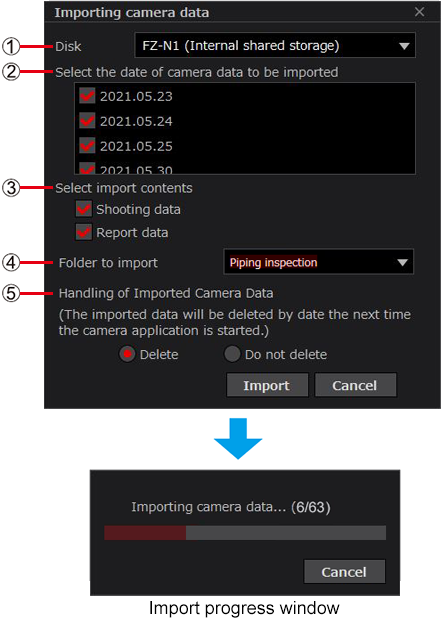
① [Disk]: Click ▼ to display the devices other than the CD drive.
Select a connected device.② [Select the date of camera data to be imported]: The dates of the data available for import are displayed.
Remove the for the date you do not want to import.
③ [Select import contents]*: Remove the for the data you do not want to import.[Shooting data] : Video and still image data [Report data] : Report data created on the camera ④ [Folder to import]: Click ▼ to display the subfolders located under the folder with the dates selected in ②.
・ Enter a new name to create a new folder and import the data into it.⑤ [Handling of Imported Camera Data]*: Select whether or not to delete the data on the camera after importing it into the computer.
Data taken with AG-WN5K1 cameras cannot be deleted.[Delete] : A message indicating that the imported data will be deleted the next time the camera will be turned on is displayed. Click [OK].
When the camera is turned on after the import, a confirmation message regarding the imported data deletion is displayed.
See the Instruction manual of the Wearable Camera LiveCast for more details.[Do not delete] : The data deletion confirmation message will not be displayed. * This cannot be selected when only recording data with AG-WN5K1 cameras is saved in the microSD card.
- Click [Confirm].
- The display returns to the recorded data window.
- The display returns to the recorded data window.
- Note
- If you have selected [Do not delete] for ⑤ in step 3, “Import of camera data has been completed.” is displayed.