- Top page
- Initial setup
Initial setup
When starting the application for the first time after the installation, you will be required to register the devices and then select the cameras*1 to be able to use the Liveviewer.
*1 Not required with the Liveviewer (Android).
The explanations are given taking the operation on a computer as an example.
Preparation
- Connect the computer to a network.
- Connect a headset or a microphone and speakers/earphones (or headphones) to the computer.
- Obtain the following information from the P2 Cast administrator.
– P2 Cast hostname – Password of the login user – ID of the user who will log in to P2 Cast – Nickname of the Liveviewer - On the Windows display settings*2, set the display size to 100%.
*2 With the Liveviewer (Android), set the font size to the default setting in the display settings.
Registering the Liveviewer
- Double-click
 on the desktop screen.
- The device registration screen, on which the application ID has been entered, appears.
(The application ID is required to register the device to P2 cast.) - The terms of use are displayed with the Liveviewer (Android).
When you tap on [Agree], the confirmation screen to authorize access to the microphone and storage will appear, then tap [Agree]. The device registration screen is displayed.
- The device registration screen, on which the application ID has been entered, appears.
- Configure each setting* and click [Apply].
- The device registration processing screen is displayed.
* Click ▼ of [Host name] to display a list of hostnames, then select the hostname you have obtained.
Enter the information you have obtained from the P2 Cast administrator in [ID], [Password], and [Nickname].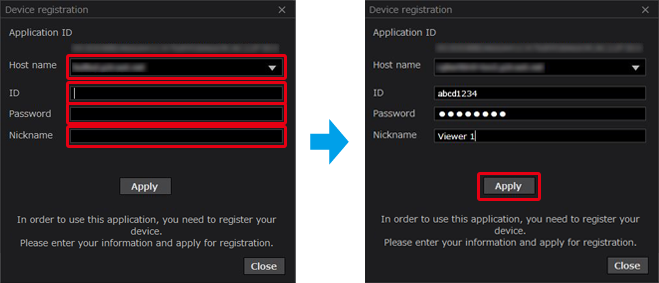
- Click [Close].
- With the Liveviewer (Android), tap [Close application].
- The P2 Cast shortcut
 is created on the desktop screen*.
* The shortcut is created on the home screen of the tablet with the Liveviewer (Android).
- The browser is launched and the P2 Cast login screen is displayed.
- The P2 Cast administrator accepts the device registration demand.
The demand is accepted when a Liveviewer is registered in P2 Cast.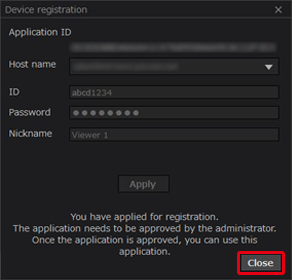
- Request a device registration to the P2 Cast administrator in P2 Cast.
- See the P2 Cast Instruction manual for the device registration procedure.

- With Liveviewer (Windows), select a camera. (→ Connecting to the camera (Windows))
- With the Liveviewer (Android), the video display screen is displayed when the application is launched. (→ Video display screen (Android))
The device registration is complete.
Connecting to the camera (Windows)
Select the cameras whose video you want to watch from the cameras registered to P2 Cast. (→ Selecting cameras)
The camera selection screen is displayed when launching the application after the device registration for the Liveviewer has been completed.
Camera selection screen
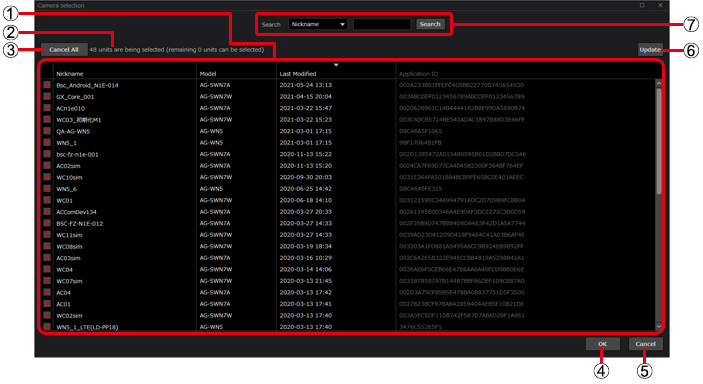
| ① | Camera list: | ||||
| The cameras registered to P2 Cast are displayed. Up to 50 cameras are checked in the order of [Last Modified]. | |||||
| ・ | [Checkboxes] | : | Selected cameras are indicated with |
||
| ・ | [Nickname] | : | The nickname entered when the camera was registered*. | ||
| ・ | [Model] | : | Displayed automatically when the camera is registered. | ||
| ・ | [Last Modified] | : | Date and time when the camera was connected for the last time. | ||
| ・ | [Application ID] | : | ID displayed when the camera has been registered*. | ||
* See the Instruction manual of the Wearable Camera LiveCast for more details. |
|||||
| ② | Camera selection information: | ||||
| Displays the number of selected cameras and the remaining number of cameras that can be selected. | |||||
| ③ | [Cancel All] button: | ||||
| Unselects all the selected cameras. | |||||
| ④ | [OK] button: | ||||
| Displays the selected cameras on the video display screen. (→ Selecting cameras) | |||||
| ⑤ | [Cancel] button: | ||||
| Closes the screen without saving the selection. | |||||
| ⑥ | [Update] button. | ||||
| Refreshes the camera list. | |||||
| ⑦ | Search field: | ||||
| Narrows the list of displayed cameras. (→ Search for cameras) | |||||
- Note
- Refer to the following if the cameras have not been registered.
– LiveCast : “Initial setup” in the Instruction manual of the Wearable Camera LiveCast – AG-WN5K1 : [Other] under [Viewer Settings] (→ Other)
Selecting cameras
Up to 50 cameras can be selected.
Preparation
- Double-click on to launch the Liveviewer.
- Check the cameras whose image you want to watch on the camera selection screen.
- If you do not want to select a camera with the
 , click
  to remove the .
– You may change the display order by clicking  , [Nickname], [Model], or [Last Modified].
– You can search for the cameras you want to select. (→ Search for cameras) 
- If you do not want to select a camera with the
- Search for cameras
Select a search category, enter a keyword and then click [Search] to narrow the displayed cameras.

 Search category : Search category : |
Click ▼ to select [Nickname] or [Model]. |
 Keyword entry field : Keyword entry field : |
You can enter up to 64 full-width or half-width characters. |
 [Search] button : [Search] button : |
Click this button to display a list of cameras meeting the search conditions. |
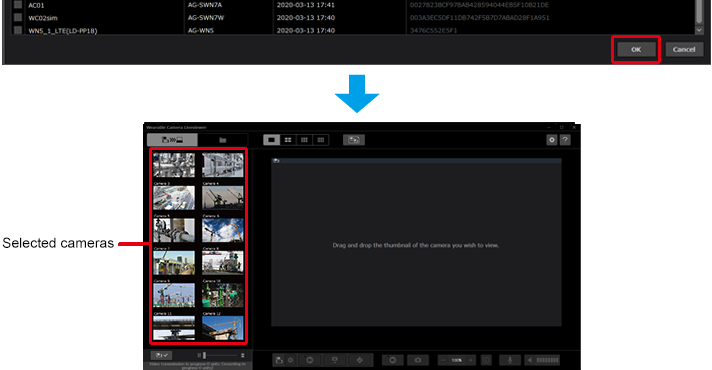
- Click [OK].
- The initial setup is complete. The thumbnails for the selected cameras are displayed on the video display screen.
- The initial setup is complete. The thumbnails for the selected cameras are displayed on the video display screen.
- Note
- You can select cameras even after the initial setup has been completed. (→ Watching camera videos (Windows))
- If the cameras are not connected to the network, only the camera selection is available. The thumbnails for the selected cameras are not displayed on the video display screen.
- You can copy “C:/Users/user name/AppData/Roaming/Panasonic/WearableCameraLiveViewer/CameraListConfig.xml” to the following folder on the tablet (Android) to apply the camera selection of the Liveviewer (Windows) to the Liveviewer (Android).
Internal storage/Android/data/com.panasonic.AG_NAMS7A/WearableCameraLiveViewer