 |
When we look at something, our left and right eyes see it from a slightly different angle. For a 3D image, two images obtained with the left and right eyes at a different viewing angle or parallax are required, and the brain combines these left and right images to create a sense of spatial depth and of 3-dimensionality. To produce easy-to-view 3D images, the following 6 key points need to be considered: [Six points to be considered to produce easy-to-view 3D images]
If 3D images are not produced correctly, they may not look 3-dimensional and could cause eye fatigue. Of the 6 points, 4 of them: "vertical deviation", "angle deviation", "differences in brightness and color", and "rotational error" can be adjusted automatically by the AG-3DA1 integrated twin-lens 3D camera recorder. When using the AG-3DA1 it's thus easy to shoot video in 3D if attention is paid to the remaining 2 important points below.
|
| ▌Adjusting the parallax amount |
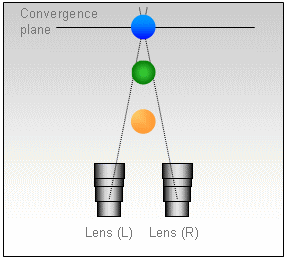
 When shooting in 3D, the point where the left and right lenses' optical
axes intersect is called the convergence point. This sets the plane of
the 3D picture. When shooting in 3D, the point where the left and right lenses' optical
axes intersect is called the convergence point. This sets the plane of
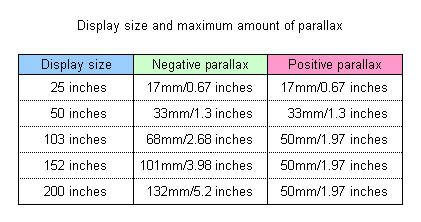
the 3D picture. Any subject between the camera and the convergence point will appear to float off the screen. With the AG-3DA1, tuning the convergence point makes it possible to adjust the parallax to control the sense of 3-dimensionality and the sense of depth. The convergence point can be confirmed on the AG-3DA1's LCD monitor using the MIX setting. When viewing the left and right images overlapped, it's the point where the left and right eye images are aligned. The sense of 3-dimensionality and depth can be confirmed by checking the horizontal separation of images to the left and right. If the separation between left and right images is too large. The parallax will be excessive, and a proper 3D effect may not be achieved. To achieve the correct parallax requires adjusting the convergence point in order to keep the parallax within the range where the 3D image can be viewed with the correct effect. The appropriate amount of parallax varies according to the display size. The display size should thus always be considered when adjusting the convergence point, so that the amount of parallax is within the appropriate range to achieve a natural-looking 3D effect. If the display size is not known the amount of parallax should be set assuming the largest likely display size. If the display size is less than about 77 inches, the amount of both positive and negative parallax should be kept to within 3% of the display width. For example, a 50-inch display is 1100 mm wide, and 3% of the display width is 33 mm, so for items with either negative and positive parallax, the parallax should be kept to less than 33 mm. For a display size of 77 inches or larger, the negative parallax should be kept under 3% of the screen width, and the amount of positive parallax should be kept under 50mm. For example, with a 103-inch display, the amount of negative parallax should be within 68 mm, and the amount of positive parallax within 50 mm. The reason why the parallax for objects that appear to be deep into the screen needs to be within 50 mm is that the sense of depth in this direction is created by shifting the left image to the left and the right image to the right. If this deviation is wider than the distance between the eyes, since the eyes cannot diverge and move outward at the same time, it causes eye fatigue.
Because the width between the eyes varies among individuals and is smaller in children, it is best to adjust the separation of the left and right images in positive parallax to within 50 mm. But even if the parallax is adjusted to within an appropriate range so the images appear 3-dimensional, it may still be too strong depending on the subject being shot, so this must also be considered.  Panasonic's BT-3DL2550 25.5-inch 3D LCD monitor is able to display a crosshatch
grid. The grid size is equivalent to 6% of the monitor width, so the left
and right images can be displayed overlapping, so it's easy to check the
left and right image deviations are equivalent to half the grid width. Panasonic's BT-3DL2550 25.5-inch 3D LCD monitor is able to display a crosshatch
grid. The grid size is equivalent to 6% of the monitor width, so the left
and right images can be displayed overlapping, so it's easy to check the
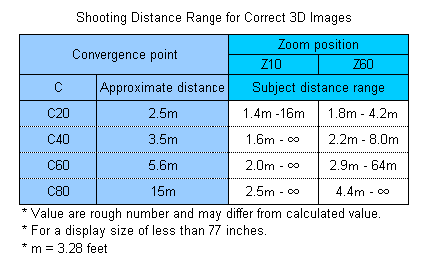
left and right image deviations are equivalent to half the grid width.The distance between the camera and subject and the position of the convergence point, both need to be within the appropriate range for natural-looking 3D images. The table below shows the appropriate range for the distance between the camera and subject, so that 3D images can be viewed with the correct effect. If the display size is about less than 77 inches, the convergence point and zoom position settings affect the appropriate range.
On the AG-3DA1, the convergence point setting is indicated by "C" and the zoom position by "Z". For example, for a convergence point setting of C60 and a zoom position of Z60, the shortest distance between the camera and subject should be 2.9 meters, and the longest distance should be 64 meters. A subject shot from a distance of 2.9 to 64 meters can thus be comfortably viewed as a 3D image. For successful 3D shooting, determine the appropriate distance range between the camera and subject. |
| ▌Recording in appropriate image composition |
When composing images in 3D, it is important to take into account the different images provided to each eye, and depth cues relayed to the brain. When an image is visible only to one eye, it may cause discomfort to the viewer. Another example is a frame violation, when an image in negative parallax moves outside of the frame. The subject may appear differently in the left and right images, confusing the brain and causing discomfort to the viewer. And, for light such as filtering through a tree or from a car's headlights, as well as objects that reflect light such as glass or water, the light may appear differently in the left and right images. When shooting in 3D, care must be taken in deciding the image composition. |
| ▌Other points |
Differences in contrast in the 3D images To produce even better 3D images, a number of other points should also be considered. When shooting subjects with a parallax, if there are extreme differences in contrast in the 3D images, they may appear as double images depending on the display on which they are viewed. This phenomenon is called crosstalk. It is caused by the right eye's image bleeding into the left eye's image on the display, and the left eye's image bleeding into the right eye's image. After shooting subjects with large differences in contrast, you should check the final images on a 3D monitor. Take the editing process into consideration when adjusting the parallax When cutting between 3D images featuring a rapid change in objects having negative or positive parallax, it may not be possible to view the 3D images with the correct effect, and the images can cause eye fatigue. When shooting in 3D, adjusting the convergence point by taking the scene order after editing into consideration will result in much better 3D images. |

