AW-UE4

  • 35. Can a network-connected camera be connected as a camera for web conferencing?

    By installing the "PTZ Virtual USB Driver" (free of charge) on your computer, you can use the target remote camera on the network as a virtual USB camera recognized by Windows computers.

    For details about the "PTZ Virtual USB Driver," please visit the following URL:


    https://pro-av.panasonic.net/en/software/ptz_vud/

    Jul., 2024 updated

  • 34. Is there a PoE hub that has been tested for operation?

    For PoE hubs that have been tested for compatibility, please refer to the "List of PoE Compatible HUBs" available at the following URL:

    https://pro-av.panasonic.net/en/download/compatibility_poe_hub/pdf/Compatibility_Chart_for_PoE_HUB.pdf

    Jul., 2024 updated

  • 33. I forgot my username and login password.

    This product does not have a function or setting to reset the username and login password to factory default values.

    Please request repair service through the retailer where you purchased the camera.

    Jul., 2024 updated

  • 32. Is there a command reference for RS422 and TCP/IP control?

    The control command list for our remote camera can be downloaded from the following website:

    https://eww.pass.panasonic.co.jp/pro-av/support/content/guide/EN/top.html

    Jul., 2024 updated

  • 31. The edges of the image appear distorted.

    The distortion at both ends of the video is due to the characteristics of the lens.

    Setting the LDC below to [On] can correct the distortion. However, the horizontal angle of view will be 108°. *Factory default setting [Off]

        ・Camera menu setting: CAMERA > LDC > [On]

        ・Web screen setting: Setup > Image/Audio > Image > Image adjust Setup > LDC > [On]

      *The LDC (Lens Distortion Correction) setting is a feature that reduces the distortion (bending) of straight lines displayed at the edges of the screen.

    Jul., 2024 updated

  • 30. Color bars are being output from the HDMI port.

    This product can switch between camera video and color bars and output them from the HDMI terminal.

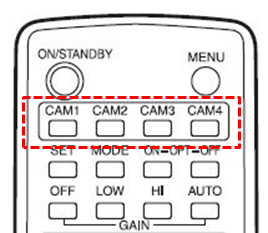
     ・When using the AW-RM50: Press the MODE button (see diagram below) to switch.

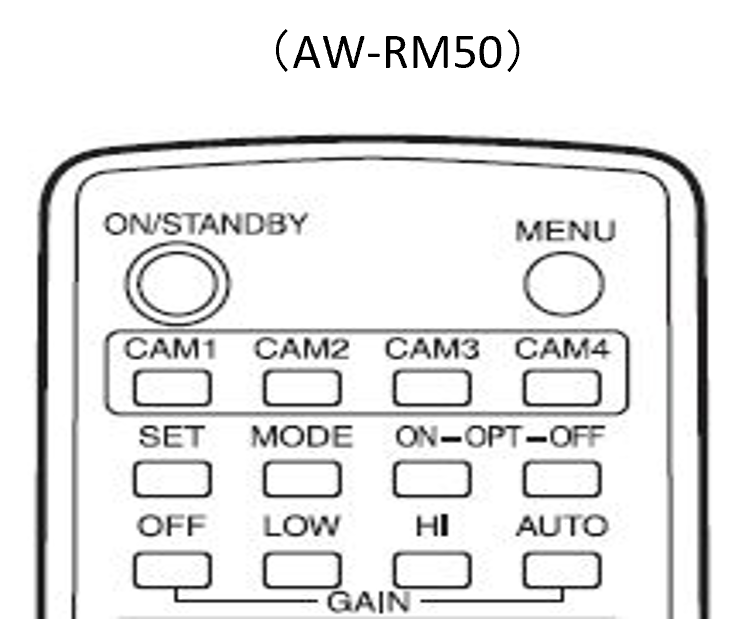
     ・Camera menu setting: SYSTEM > Color Bar > [On/Off] *Factory default setting [Off]

     ・Web screen setting: Setup > Image/Audio > System > Color Bar > [On/Off]

    Jul., 2024 updated

  • 29. Is it possible to supply power from the USB port?

    It is possible.

    *When powered from a computer or similar device that supports the USB battery charging standard,

      the only selectable priority modes will be [USB (4K)] and [USB].

      Also, video output from the HDMI terminal is not possible.

    Jul., 2024 updated

  • 28. If both PoE and USB power are used, which one takes priority?

    Power supply from PoE is prioritized.

    *If PoE power is disconnected from a state of simultaneous power supply, or if PoE power is connected from a USB power supply state,

      the camera will reboot and you will not be able to output video or control it until it starts up.

    Jul., 2024 updated

  • 27. Which LAN cable should be used?

    Please use a LAN cable that is Category 5e or higher, and below 100 meters in length.

     ・When connecting this product directly to a computer or other product, please use a crossover cable.

     ・When connecting to a switching hub or similar product, please use a straight cable.

    Jul., 2024 updated

  • 26. Unable to change the IP address from the EASY IP Setup Software.

    If the following setting is [20min], you will not be able to change the network settings if it has been more than approximately 20 minutes since the product was powered on.

    In this case, please restart the product before changing the IP address.


        ・Web screen settings location: Setup > Network > Easy IP Setup accommodate period > [20min], [Unlimited] *Factory default setting [Unlimited]

            *This setting is not available in the camera menu, so please change it from the web settings screen.

    Jul., 2024 updated

  • 25. What is the range of private addresses that can be configured?

    The factory settings are configured as follows.

    If setting manually, please match the first to third segments of the default gateway with the IP address.


    [Factory Settings]

    IP Address: 192.168.0.10

    Subnet Mask: 255.255.255.0

    Default Gateway: 192.168.0.1

    *The usable IP addresses are 192.168.0.2 to 192.168.0.254


    [Example Setting: Manual Configuration]

    IP Address: 192.168.2.20

    Subnet Mask: 255.255.255.0

    Default Gateway: 192.168.2.1

    *The usable IP addresses are 192.168.2.2 to 192.168.2.254

    Jul., 2024 updated

  • 24. The H.264/H.265 image is not displayed on the live screen.

    The live view of this product cannot display H.264/H.265 images. Please use external equipment or software that supports H.264/H.265 images.

    Jul., 2024 updated

  • 23. The camera is installed on the ceiling. What is the procedure to invert the output image?

    Please change the camera menu settings according to the installation status of the camera. *Factory default setting [Desktop]

       - Camera Menu Setting Location: SYSTEM > Install Position > [Desktop] or [Hanging]

       - Web Interface Setting Location: Setup > Image/Audio > System > Install Position > [Desktop] or [Hanging]

    Jul., 2024 updated

  • 22. Are there any restrictions depending on the power supply condition?

    The selectable Priority Mode changes depending on the power supply status.

    To view video from the HDMI output, please use PoE or USB (AC adapter) for power supply.

    * The available formats that can be set vary depending on the power supply status and Priority Mode.

    For details, please refer to the "Priority Mode" page in the Instruction Manual .

    * In [USB(Zoom)] and [USB(Teams)] modes, video is not displayed on the Web Live screen, but it can be controlled.

    Jul., 2024 updated

  • 21. What is Priority Mode?

    This product offers 9 modes (*) to suit different applications.

    Settings can be changed via the camera menu or the web interface.

       - Camera Menu: SYSTEM > Priority Mode > [Select Mode]*

       - Web Interface: Setup > Basic > Priority Mode > [Select Mode]*

    *The selectable Priority Mode varies depending on the power supply status.


    Priority Mode

       - [HDMI(4K)]: Outputs 4K video to an external monitor connected via an HDMI cable.

       - [IP(4K)]: Streams 4K images in H.264/H.265 format over IP.

    * The live view of this product cannot display H.264/H.265 images. Please use external equipment or software that supports H.264/H.265 images.

       - [USB(4K)]: Can be used as a 4K web camera.

       - [HDMI/USB]: Outputs HD format video to an external monitor connected via an HDMI cable and can be used as a web camera.

    The product can also be controlled from a computer. (This mode can only be set when using PoE power supply.)

       - [USB]: Can be used as a web camera. (This mode can only be set when powered by a PC.)

       - [USB(Zoom)]: Can be used as a web camera. Optimized for use with the Zoom application. The product can also be controlled from a computer.

       (To minimize UVC output delay, UAC output and video display on HDMI and Web Live screens are not performed.)

       - [USB(Teams)]: Can be used as a web camera. Optimized for use with the Teams application. The product can also be controlled from a computer.

       (To minimize UVC output delay, UAC output and video display on HDMI and Web Live screens are not performed.)

    In the factory default state, the product starts in USB(Teams) mode when connected to a PC via a USB cable.

       - [HDMI]: Outputs HD format video to an external monitor connected via an HDMI cable. (This mode can only be set when powered by an AC adapter.)

       - [IP]: Allows IP video transmission. H.264/H.265 image IP transmission is also possible.

    * The live view of this product cannot display H.264/H.265 images. Please use external equipment or software that supports H.264/H.265 images.

    * Please refer to the "Priority Mode" page in the Instruction Manual for the formats and resolutions that can be output simultaneously.

    Jul., 2024 updated

  • 20. How is the pan/tilt controlled?

    The pan/tilt of this product is manually operated within the following ranges.

    When adjusting manually, please loosen each fixing screw before making adjustments.

    - Pan: 220° (±110°)

    - Tilt: 50° (±25°)

    Jul., 2024 updated

  • 19. The focus is not sharp.

    This product uses a fixed-focus lens designed to focus on the entire subject at a distance of 700 mm or more.

    If the distance to the subject is less than 700 mm, it may not be in focus. Please ensure the distance to the subject is 700 mm or more.

    Jul., 2024 updated

  • 18. Please tell me the length of the included USB cable.

    Cable length: Approximately 180 cm (measured value)

    Jul., 2024 updated

  • 17. What is the standard of the USB port?

    It is USB Type-C.

    * The included USB cable has screws to prevent it from coming loose from the USB port.

    Please use the included USB cable.

    Jul., 2024 updated

  • 16. Are the USB cable and AC adapter included?

    A USB cable is included.

    An AC adapter is not included.

    Jul., 2024 updated

  • 15. Is it possible to mute the built-in microphone?

    The built-in microphone can be turned on/off via settings. *Factory default setting [On]

     ・Camera menu setting location: SYSTEM > Mic > [On/Off]

     ・Web screen setting location: Setup > Image/Audio > System > Mic > [On/Off]

    Jul., 2024 updated

  • 14. How many preset memories can be registered?

    Preset memory can be registered for up to 100 locations.

    * The number of preset memories that can be registered and recalled varies depending on the controller used.

    * The AW-RM50G can register and recall up to 12 locations.

    Jul., 2024 updated

  • 13. What HDMI output formats are supported?

    This unit supports the following formats.

    [4K Format]

     3840x2160/30p, 29.97p, 25p

    [HD Format]

     1920x1080/60p, 59.94p, 50p, 30p, 29.97p, 25p

     1280x720/60p, 59.94p, 50p

    * The output format will change depending on the setting of the Priority Mode.

      For details, refer to the "Priority Mode" page in the Instruction Manual.

    Jul., 2024 updated

  • 12. Is it possible to control it with the AW-RP50?

    Not supported. There are no plans for support.

    Jul., 2024 updated

  • 11. What controllers are supported?

    Please refer to the "List of Compatible Controllers" published at the following URL for supported controllers.

    * Firmware updates for the main unit may be required for use.

    https://pro-av.panasonic.net/en/products/compatibility_chart/pdf/Compatibility_Chart_for_Operation_Devices.pdf

    Jul., 2024 updated

  • 10. Is there a screw hole for tripod mounting?

    There is one 1/4-20UNC screw hole on the bottom surface.

    Jul., 2024 updated

  • 9. Does it support PoE?

    This unit supports PoE. (Compliant with [IEEE802.3af] standard)

    Jul., 2024 updated

  • 8. What is the horizontal/vertical angle of view?

    When LDC function is set to OFF: Horizontal: 111°, Vertical: 75°

    When LDC function is set to ON: Horizontal: 108°, Vertical: 75°

    * The LDC (Lens Distortion Correction) function is a feature that reduces distortion (bending) of the straight-line portions displayed on the edges of the screen. Factory default setting: OFF

    Jul., 2024 updated

  • 7. I want to control it from my computer, but the web page does not open.

    The network functions of the AW-UE4 will not operate unless an initial account is set up.

    In the initial state, the account setup screen will appear before the web screen is displayed, so be sure to set it up.

    * A computer is required to set up the initial account.

    * For detailed settings, refer to the page "Setting Up the Initial Account" in the Instruction Manual.

    Jul., 2024 updated

  • 6. How can I operate it with the remote control (AW-RM50)?
    (Camera Control, Power on, Menu display, Pan/Tilt/Zoom, etc.)

    1. Check the "IR control" setting and set it to "On".  (*1)Settings for accepting control from AW-RM50

        * Please change from the setting screen of the web browser. It cannot be set in the camera menu.

               ・Web Browser : Setup  >  Image/Audio  >  System  >  IR Control  >  [On/Off] *Default setting is [On]   


    2. Set the [IR ID] setting of this unit and AW-RM50 to the same value.

        If the power status indicator lamp of the camera flashes orange when you press the operation button of AW-RM50, it means that the [IR ID] does not match.

        Press the operation button after pressing the [CAM1] button on the AW-RM50.The default setting of [IR ID] of this unit is [CAM1].


       * You need to press and hold the power (ON / STANDBY) button and MENU button for 2 seconds.

       (*2) You can control up to 4 cameras with the AW-RM50 (remote control). This is a setting to prevent interference in case you control multiple cameras.


       Select the camera to be operated with the [CAM1] to [CAM4] buttons on the remote control side first according to the [IR ID] setting set for the camera.

              Camera [IR ID] setting:

               ・Camera Menu : SYSTEM  >  IR ID  >  [1]~[4]

        ・Web browser : Setup  >  Image/Audio  >  System  >  IR ID  >  [1]~[4]


    Nov., 2019 updated

  • 5. VLC Media Player may stop during RTSP delivery.

    If VLC Media Player stops, try playing it again. For long-term delivery, use a decoder that has an automatic reconnection function.


    Nov., 2019 updated

  • 4. The streaming video on web browser may stop.

    Please update your web browser.


    Oct., 2019 updated

  • 3. May not recognize USB connection (displayed as unknown device)

    Please restart the main unit. When switching the Priority Mode, disconnect the USB cable to switch.


    Oct., 2019 updated

  • 2. Pink bands noise may appear in streaming video.

    It may occur when the IP (4K) setting and the color-bars are ON. Turn off the color-bars function and switch to IP (4K) mode.


    Oct., 2019 updated

  • 1. After turning on the power, the status LED may be displayed in orange.

    It may occur after switching "Frequency" mode. Please restart the main unit.


    Oct., 2019 updated