AW-RP60

  • 26. Are there any PoE hubs that have been tested for compatibility?

    Please refer to the "Compatibility Chart for PoE HUB" available at the following URL for a list of PoE hubs that have been confirmed to work.

    https://pro-av.panasonic.net/en/download/compatibility_poe_hub/pdf/Compatibility_Chart_for_PoE_HUB.pdf


    Jun, 2024 updated

  • 25. Is there a command reference for RS422 and TCP/IP control?

    Yes, it is available from the following website.

    https://eww.pass.panasonic.co.jp/pro-av/support/content/guide/DEF/RP50_120/RemoteControllerInterfaceSpecifications-E.pdf


    Jun, 2024 updated

  • 24. Adjusting the FOCUS dial doesn't seem to affect the focus.

    Due to differences in the camera models and ZOOM positions, the speed of the FOCUS operation may vary,

       and it may be difficult to see the change in the FOCUS position unless you turn the FOCUS dial a lot.

       Please use the one-touch AF (press the FOCUS dial) function (*) to adjust the FOCUS, and then fine-tune it with the FOCUS dial.

    (*) One-touch AF function: While in manual focus mode, pressing the FOCUS dial will initiate autofocus and adjust the focus.

       In the firmware released on February 20th (SYSTEM VERSION: 1.10-00-0.05), the control speed of the FOCUS dial can now be set (6 levels).


      ・Please install the firmware from the following URL:

    https://eww.pass.panasonic.co.jp/pro-av/support/content/download/EN/ep2main/soft/upgrp60_e.htm


      ・The following menu setting will be added:

       (Setting location) [MENU] > "FUNCTION" > "PTZ INFO1" > "FOCUS SPEED" → [1-6] *Initial setting [3]

                        *When the setting value is [6], turning the FOCUS dial will result in the largest movement of the focus position.


      It is also possible to assign this menu to the F1-F4 dials.

       (Setting location) [MENU] > "FUNCTION" > "F1-F4 KNOB ASSIGN" → [FCS_SPD]


    Jun, 2024 updated

  • 23. Is it possible to launch and use the setup software and the easy IP configuration software at the same time?

    You cannot launch and use the setup software and the simple IP setup software at the same time.


    Jun, 2024 updated

  • 22. I want to download the setup software.

    The setup software dedicated to AW-RP60 (Setup Software) can be downloaded from the following URL.Please refer to the instruction manual for the operation of the setup software (Setup Software).


    (Supported OS: Windows 10, Windows 7)

    https://eww.pass.panasonic.co.jp/pro-av/support/content/download/EN/ep2main/soft/tool_rp60_agree_1000e.htm


    Jun, 2024 updated

  • 21. I cannot connect to the AW-RP60 from the setup software. "Connect Error" is displayed.

    To connect to the AW-RP60 using the setup software, the following two settings are required.


    (1) The account information [ID, Password] of the AW-RP60 itself must be registered in advance.

         By setting the account information [ID, Password] registered on the AW-RP60 within the setup software [Setting], connection becomes possible.

          [ID and Password Setting Location]: "MENU" > "MAINTENANCE" > "RP SETTING" → [NEW ID], [NEW PASSWORD], [Retype PASSWORD]

          * The ID can be set to alphanumeric characters, 8 to 16 characters long.

         The password must be 8 to 16 characters long and a combination of letters, numbers, and symbols.

          * For details, please check the [MAINTENANCE] page in the instruction manual.


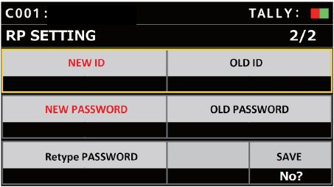
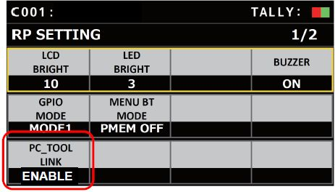
    (2) The setting to connect with the setup software must be set to [ENABLE].

         [PC_TOOL_LINK Setting]: "MENU" > "MAINTENANCE" > "RP SETTING" → [ENABLE]

          * If you change the item with the F5 dial, the setting will revert to [DISABLE].

         Please do not turn the F5 dial while connected to the setup software.


    Jun, 2024 updated

  • 20. I cannot connect to the remote camera with user authentication enabled.

    If the connected camera has user authentication enabled, the following settings are required for this unit to connect.


    Register the account information (User Name, Password) that is registered on the connected camera.

    (Settings location) "MENU" > "System" > "MANUAL IP SET/USER AUTH"

                        → Select the target camera with "CAM SEL."

                        → Enter "USER NAME," "PASSWORD," and "RETYPE PASSWORD."

         Select "YES" with the F4 dial and press the F4 dial.

         A confirmation screen will appear on the LCD screen asking if you want to save the settings. Press the F3 (YES) dial.


    *Settings can also be performed using the setup software.


    Jun, 2024 updated

  • 19. What is the user account setting for the connected camera?

    If the connected camera has user authentication enabled, these settings will allow the unit to connect.


    Register the username (User name) and password (Password) that are registered on the connected camera.

    (Settings location) "MENU" > "System" > "MANUAL IP SET/USER AUTH"

                        → Select the target camera with "CAM SEL."

                        → Enter "USER NAME," "PASSWORD," and "RETYPE PASSWORD."

         Select "YES" with the F4 dial and press the F4 dial.

         A confirmation screen will appear on the LCD screen asking if you want to save the settings. Press the F3 (YES) dial.


    *Settings can also be performed using the setup software.


    Jun, 2024 updated

  • 17. Is it possible to turn on the connected cameras in conjunction with powering on the AW-RP60?

    Yes, it is possible.


    By setting the "AUTO POWER" item in the SYSTEM menu under "CAMERA" to "ON," the remote camera's power will turn on when the "CONNECT MODE" item in the SYSTEM menu under "CONNECT SETTING" is set to "Serial" or "LAN."

    *At this time, the remote camera's power must be in (STANDBY) mode.

    *The remote camera's power cannot be transitioned to (STANDBY) mode in conjunction with this unit's power being turned (OFF).


    Jun, 2024 updated

  • 16. Is there a tracing memory function?

    This unit is not equipped with a tracing memory function.


    Jun, 2024 updated

  • 15. How do I change the preset memory group?

    On the status screen, operate the [F1] dial to change [PMEM GP].

    ・Turn the [F1] dial to select the preset memory group.

    ・Press the [F1] dial to confirm the preset memory group.

    (AW-RP60 LCD Panel)


    Jun, 2024 updated

  • 14. How do I playback preset memories?

    There are two ways to play back the preset memory.

    ・Play it back using the [PRESET MEMORY SELECTION 1–10] buttons on this unit.

    ・Display the preset memory list on the LCD panel and play it back using the F1–F5 dials.

    【Preset Memory List Display Settings】: [MENU] > [PMEM SETTING] > [PMEM LIST]

    Select the row (yellow frame) with the F5 dial, and press the F1–F4 dial at the same position as the preset number column to play it back.


    Jun, 2024 updated

  • 13. How do I register/delete preset memories?

    (Register)

    ・Short-press (or long-press (*)) the [PRESET STORE] button. The button will light up, and the preset memory registration state will be activated.

    ・Press the preset memory selection button [1–10] to register.

    * To deactivate the preset memory registration state, press the [PRESET STORE] button to turn off the button.


    (Delete)

    ・Short-press (or long-press (*)) the [PRESET DELETE] button. The [DELETE] button will light up, and the preset memory deletion state will be activated.

    ・Press the preset memory selection button [1–10] to delete.

    * Once the preset memory is deleted, the button will turn off.


    (*) The action of the PRESET STORE/DELETE button (short-press/long-press) can be selected in the following menu.

    (Set location) [MENU] > "MAINTENANCE" > "RP SETTING" > [PRESET BUTTON] → [SHORT (short-press)/LONG (long-press)] *Default setting [SHORT]


    Jun, 2024 updated

  • 12. How do I select a camera group?

    On the status screen, operate the [F2] dial to change [CAM GP].

    - Rotate the [F2] dial to select the camera group.

    - Press the [F2] dial to confirm the camera group.

    (AW-RP60 LCD Panel)


    Jun, 2024 updated

  • 11. How do I turn on a remote camera that is in standby mode?

    Press and hold the camera selection button [CAMERA SELECTION] for about 3 seconds, and the LCD panel will display the name of the remote camera along with "ON [F2]" and "OFF [F3]".

    While holding down the camera selection button, press the [F2] dial to turn the power on.

    * Pressing the [F3] dial will put the camera into standby mode.

    (AW-RP60 LCD panel)


    The connected cameras can also be powered on collectively using the following settings and operations.

    (Setting location) [MENU] > "SYSTEM" > "CAMERA" > [CAM POWER] → [GRP ON]: Cameras in the currently selected group

    → [ALL ON]: Cameras assigned in CONNECT SETTING


    Jun, 2024 updated

  • 10. I connected the LAN cable, but it is not being recognized.

    (For serial connection)

    - Please use a straight LAN cable (Category 5e or higher, up to 1000m).

    - Connect the LAN cable from the AW-RP60 to the SERIAL CONT: 1-5 terminals on the rear panel.

         At this time, set the connection to "Serial" according to the connection destination.


    [When connected to SERIAL CONT terminal 1]

         (Setting location) [MENU] > "SYSTEM" > "CONNECT SETTING" > "CAM1" → [Serial]


    (For IP connection)

    - The LAN port of this device does not have automatic recognition for straight/cross cables.

         When directly connecting this device to equipment, use a straight cable (Category 5e or higher, up to 100m).

         If connecting via a switching hub, use either a straight or cross cable (Category 5e or higher, up to 100m).

    - Connect the LAN cable from the AW-RP60 to the IP CONT port on the rear panel.

    - Ensure that the following connection setting is set to "LAN".


    [When connecting CAM1 via IP]

         (Setting location) [MENU] > "SYSTEM" > "CONNECT SETTING" > "CAM1" → [LAN]


    - Ensure that the IP address of the connected camera matches the following IP address settings on the AW-RP60.

         (Setting location) [MENU] > "SYSTEM" > "MANUAL IP SET/USER AUTH"

    - If the connected camera has enabled user authentication, ensure that the authentication account matches that of the AW-RP60.

         The authentication account for each connected camera can be set in the following menu:

         (Setting location) [MENU] > "SYSTEM" > "MANUAL IP SET/USER AUTH"

          * These settings can also be configured via Setup Software.


    Jun, 2024 updated

  • 9. Is there a recommended DC power supply?

    The AW-PS551P can be used.


    Jun, 2024 updated

  • 8. If both an external DC power supply and PoE are used, which one takes priority?

    Power supply from an external DC power source takes priority. If the external DC power source is disconnected while both connections are active, the unit will automatically restart.

    Please be aware that communication with the camera will be interrupted during this time.


    Jun, 2024 updated

  • 7. Does it support PoE (Power over Ethernet)?

    Supports PoE (compliant with IEEE802.3af).

    With PoE support, power can be supplied through the LAN cable.

    - LAN cable: Category 5e or higher

    - Cable length: Up to 100m


    Jun, 2024 updated

  • 6. How many preset memories can be registered/played back?

    You can register and recall up to 100 preset memories per camera.


    * Preset memories are managed by the camera.


    Jun, 2024 updated

  • 5. How can I operate the camera menu?

    Select the camera you want to display the menu for using the camera selection button [CAMERA STATUS].

    Press the [CAMERA OSD ON/OFF] button on the upper right of the panel briefly (or press and hold (*) to display the camera menu on the output video.

    - Adjust settings using the [CAMERA OSD SELECT] dial.

    - Press the [CAMERA OSD ON/OFF] button briefly (or press and hold) again to hide the menu.


    (*) The operation of the CAMERA OSD button (short press/long press) can be selected in the following menu.

    (Setting location) [MENU] > "MAINTENANCE" > "RP SETTING" > [CAM OSD BUTTON] → [SHORT (short press) / LONG (long press)] * Default setting: [SHORT]


    Jun, 2024 updated

  • 4. Is it possible to mix IP-connected and serial-connected remote cameras?

    Yes, it is possible. This device can connect up to a maximum of 200 cameras, combining both serial connection (up to 5 cameras) and IP connection.


    Jun, 2024 updated

  • 3. How many AW-RP60 units can be installed within the same system?

    There is no problem even if multiple cameras are connected, but the number of AW-RP60 that can simultaneously connect to a single remote camera is limited to 5.

    It is also possible to mix IP-connected and serial-connected remote cameras.


    Jun, 2024 updated

  • 2. How many cameras can be controlled?

    It is possible to control up to 200 remote cameras via IP connection.

    A maximum of 5 cameras can be controlled via serial (RS422) connection.


    Jun, 2024 updated

  • 1. Which cameras are supported?

    * Software version update may be required for usage.


    Controllable remote cameras are also listed at the URL below under "Compatibility Chart for Operation Devices":

    https://pro-av.panasonic.net/en/products/compatibility_chart/pdf/Compatibility_Chart_for_Operation_Devices.pdf


    Jun, 2024 updated