Procedure
of Lens firmware update
STEP 1. Preparation of update program
1-1.
Check the current version of firmware of your lens
The version of lens firmware is
displayed in OTHER FUNCTIONS menu screen of setting menu.
1.
Mount the lens onto the camera recorder.
2.
Turn the power on.
3.
Press MENU
button to display the setting menu.
4.
Use OPERATION lever to select the OTHER FUNCTIONS menu and press OPERATION lever (ENTER button)
to open the OTHER FUNCTIONS menu.
5.
Select the item “LENS INFO” and press OPERATION
lever (ENTER button). And select the “YES” and press

OPERATION
lever (ENTER button) to display the lens
firmware version.
1-2.
Download the file for update
License Agreement
Download
of any file for Panasonic firmware update requires your agreement with the
software agreement.
You may
proceed to the next step only once you have agreed.
Please
make sure to confirm all terms and conditions in advance to proceed to
download.
When
“Accepted” button is clicked, download page is opened.
For
other maker's lenses except Panasonic, firmware update program is available
from Panasonic support site
“Joint
update service for Four Thirds lenses”.
Download the firmware
1. Make a temporary folder on your PC for downloading
each file. e.g.
C:/Temp.
2. Download and save the file in the folder you made.
3. Check the file size first by selecting
"properties" in the right click menu.
(For Mac, by selecting "Information" in Finder)
If the size is different from the one described in the
download page, please download it again.
1-3. Extraction of the file
For
Windows
1.
Double click the downloaded files. You may see following message after double
click the downloaded files.
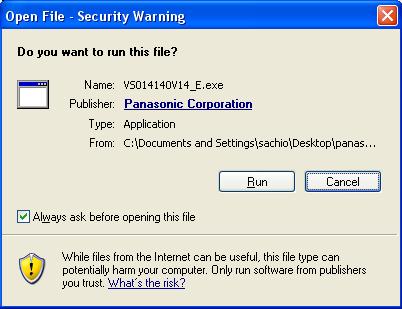
2. When “Run”
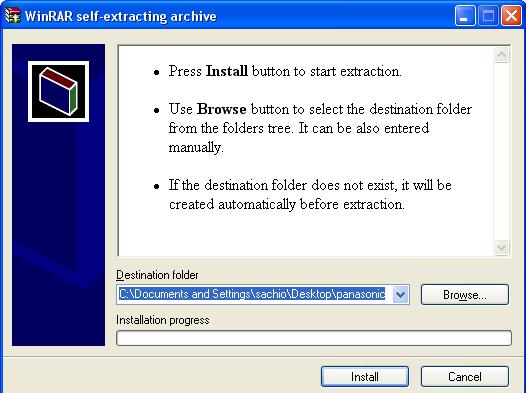
button is clicked, the following window is opened.
Please
execute the extraction according to the window.
For
Macintosh
Extract downloaded file
- It depend on your Macintosh setting
about whether the file maybe automatically extracted or not.
- If your OS is older than Mac OS X 1.02, Please use Extract
software,
If your Macintosh OS is
newer than Mac OS X 1.03, double click the files.
1-4.Copy the extracted firmware update
program.
1. Preparation of the SD Memory Card
- Prepare an SD memory card
whose buffer memory size is bigger than the update program.(bin
or lin file)
- Format the SD memory card by using
AG-AF100 series camera recorder.
Note.
- Formatting should be done by camera recorder, not by PC or Mac.
- When formatting the SD Memory Card, all data, including protected data,
will be erased and can not be recovered.
Please make sure to back up your important data so that you don't loose
it.
2. Copy the extracted firmware update program (bin or lin file) into an SD memory card
Copy the firmware update program
(bin or lin file) extracted from the downloaded file
in Step 1-3.
into the Root directory (*1) of the
SD memory card.
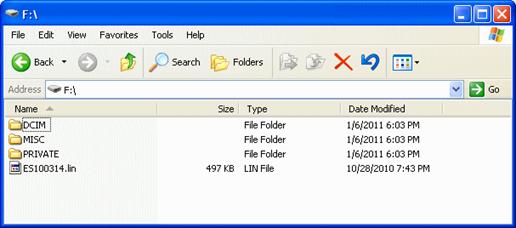
The
above file name is an example.
Note.
- Please make sure to copy only one lens firmware update program(bin or lin file) on the SD memory card.
- Please do NOT copy any other file in the SD memory card because it may
cause a malfunction.
(*1) Root directory = The first or top-most directory in the hierarchy.
Step
2 Lens firmware update
CAUTION: Before Updating Software
Please do not attempt the
following operations before completion of update.

<
External Power >
It is
best to power the unit from the external power supply. This will prevent the
unit from shutting off during updating.
1.
Mount the lens onto the camera
recorder.
2.
Turn the power on.
3.
Confirm that the camera
recorder is set to
4.
Insert a formatted SD memory card into the
SD memory card slot 1.
5.
Press the MENU button to display the setting menu.
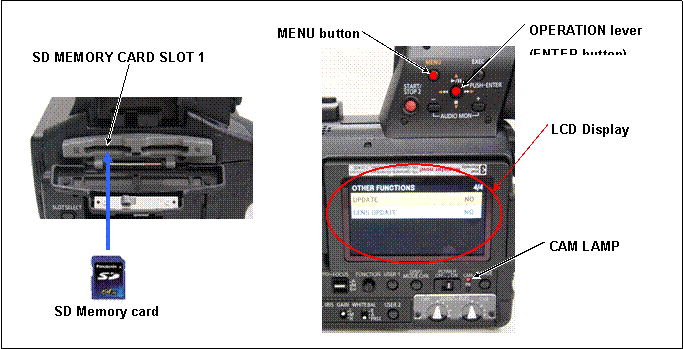
6.
Use the OPERATION lever to select the item “OTHER FUNCTIONS” and press
OPERATION
lever (ENTER button) to open
the OTHER FUNCTIONS menu.
7.
 Select
the item “LENS UPDATE” on the menu
and press the OPERATION lever (ENTER button).
Select
the item “LENS UPDATE” on the menu
and press the OPERATION lever (ENTER button).
When update is executed, select the
item “YES” and press OPERATION lever (ENTER button).
NOTE: If a newer or same version of the updated firmware has already
installed in the lens,
the firmware update process will not start. In this case, the
message “UPDATING SYSTEM
UPDATE ERROR!!”
will appeared as follows. When the following message is
displayed, press OPERATION
lever (ENTER button).
The camera recorder will 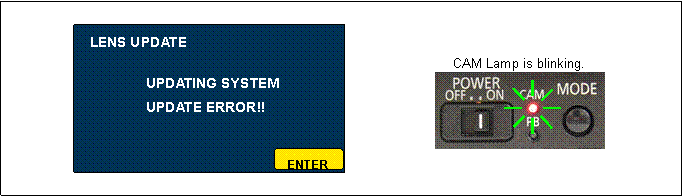 turn off the power and turn on again automatically.
8.
 Update
program is started and the message “UPDATING
SYSTEM PLEASE WAIT…” appears on screen.
Update
program is started and the message “UPDATING
SYSTEM PLEASE WAIT…” appears on screen.
During updating software, CAM Lamp is blinking.
u Software update takes approx. 5min. Do not power down while updating.
9.
When the update is completed,
the camera recorder will turn off the power and turn on again automatically.
10.
Confirm that the version number is renewed
for your confirmation update was correctly done follow
the
item “1-1. Version display
method”.